Spring-Boot


Spring Boot
———————————————01,Spring 的纯注解配置———————————–
一,Spring的纯注解配置
1),@Bean
作用:创建bean对象并交给iocMap去管理,等价于
属性:value:指定iocMap的key,等价于bean标签的id
①,不使用注解配置:
src.main.resource.applicationcontext-dao.xml 中
……
②,纯注解配置:
com.xxx.MybatisConfig 中
  public class MyBatisConfig {
    @Bean
    public SqlSessionFactoryBean sqlSessionFactoryBean(DataSource dataSource){
       ......
    }
  }
代码展示:
①,不使用注解配置:
<!--sqlSessionFactory-->
<bean id="sqlSessionFactory" class="org.mybatis.spring.SqlSessionFactoryBean">
    <property name="dataSource" ref="dataSource"></property>
</bean>
②,纯注解配置:
public class MyBatisConfig {
    @Bean
    public SqlSessionFactoryBean sqlSessionFactoryBean(DataSource dataSource){
        SqlSessionFactoryBean sqlSessionFactoryBean = new SqlSessionFactoryBean();
        sqlSessionFactoryBean.setDataSource(dataSource);
        return sqlSessionFactoryBean;
    }

}
2),@PropertySource
作用:加载properties文件,等价于
属性:value:指定properties的位置
①,不使用注解配置:
src.main.resource.applicationcontext-dao.xml 中
<context:property-placeholder location=“classpath:db.properties”></context:property-placeholder>
②,纯注解配置:
com.xxx.DataSourceConfig 中
@PropertySource("classpath:db.properties")
public class DataSourceConfig {
      .......
}
代码展示:
①,不使用注解配置:
<context:property-placeholder location="classpath:db.properties"></context:property-placeholder>②,使用注解配置:
@PropertySource("classpath:db.properties")
public class DataSourceConfig {
    ......
}
3),@ComponentScan
作用:指定spring要扫描的包,等价于
属性:value:指定要扫描的包
①,不使用注解配置:
src.main.resource.applicationcontext-service.xml 中
<context:component-scan base-package=“com.hg.service”></context:component-scan>
②,纯注解配置:
com.xxx.DataSourceConfig 中
@ComponentScan("com.hg.service")
public class ServiceConfig {
     ......
}
代码展示:
①,不使用注解配置:
<context:component-scan base-package="com.hg.service"></context:component-scan>②,使用注解配置:
@ComponentScan("com.hg.service")
public class ServiceConfig {
    ......
}
4),@Configuration
作用:标识当前类是一个配置类,即该类等价于applicationContext.xml
5),@Import
作用:导入其他类,等价于
属性:value:配置被导入的类
①,不使用注解配置:
// 在applicationcontext.xml中引入
<beans>
    ...
    <import resource="classpath:applicationcontext-dao.xml"></import>
    <import resource="classpath:applicationcontext-service.xml"></import>
    <import resource="classpath:applicationcontext-tx.xml"></import>
    ...
</beans>
②,使用注解配置:
@Import({DataSourceConfig.class, MyBatisConfig.class, ServiceConfig.class, TxConfig.class})
public class SpringConfig {
}
代码展示:
①,不使用注解配置:
web.xml
<context-param>
    <param-name>contextConfigLocation</param-name>
    <param-value>classpath:applicationcontext-*.xml</param-value>
</context-param>
<listener>
    <listener-class>org.springframework.web.context.ContextLoaderListener</listener-class>
</listener>
②, 纯注解配置:
com.xxx.config.SpringConfig
@Import({DataSourceConfig.class, MyBatisConfig.class, ServiceConfig.class, TxConfig.class})
public class SpringConfig {
 ......
}
—————————————————–02,Spring Boot入门—————————————-
一,Spring Boot的介绍
Spring Boot:不是对spring的增强(spring + springmvc),而是提供了快速开发spring应用的方式。
特点:
简化xml —> xml变配置类
简化maven配置 —> starter
内嵌tomcat
二,Spring Boot入门案例
1,pom.xml
 ①继承springboot父工程 ----------------------  父工程中的pom.xml添加

<parent>
    <groupId>org.springframework.boot</groupId>
    <artifactId>spring-boot-starter-parent</artifactId>
    <version>2.3.2.RELEASE</version>
    <relativePath/> <!-- lookup parent from repository -->
</parent>
②添加启动器 --------------------- 子工程中的pom.xml添加

<!--  springboot的web启动器(spring+springmvc)-->
<dependency>
   <groupId>org.springframework.boot</groupId>
   <artifactId>spring-boot-starter-web</artifactId>
</dependency>
2,controller
@Controller
public class HelloController {

   ... ...
}
3,app
package com.hg; // 注意:启动类所在的包是service,controller的上级目录
@SpringBootApplication //标识当前类是springboot的启动类
public class SpringbootHelloworldApp{
    public static void main(String[] args) {
       SpringApplication.run(SpringbootHelloworldApp.class, args);
    }
}
—————————————————–03,Spring Boot的启动器———————————-
三,Spring Boot的启动器
1,starter是什么?
starter(启动器):一堆依赖和配置类的集合
2,starter命名规范
官方:
前缀:spring-boot-starter-
规范:spring-boot-starter-模块名
举例:spring-boot-starter-redis
<dependency>
   <groupId>org.springframework.boot</groupId>
   <artifactId>spring-boot-starter-web</artifactId>
</dependency>
第三方:
后缀:-spring-boot-starter
规范:模块名-spring-boot-starter
举例:mybatis-spring-boot-starter
四,Spring Boot 的配置文件
1,application.properties
server.port=8080
server.servlet.context-path=/springboot_helloworld
2,application.yml—–掌握
server:
  port: 80
  servlet:
    context-path: /springboot_helloworld
yaml语法:
① “." ———-> “:”
② 空格缩进
③ ”=“ ———-> “:+空格”
五,Spring Boot项目的两种发布方式(了解)
1,jar方式
步骤① :在pom.xml中添加一个springboot的构建插件
<build>
  <plugins>
     <plugin>
        <groupId>org.springframework.boot</groupId>
        <!--自动检测项目中的 main 函数-->
        <artifactId>spring-boot-maven-plugin</artifactId>
     </plugin>
  </plugins>
</build>
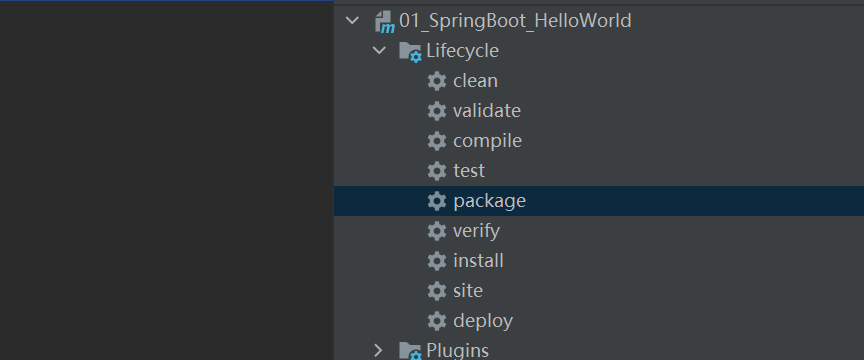
步骤② : 在maven视图中,选择"package",在target中会产生xxx.jar包

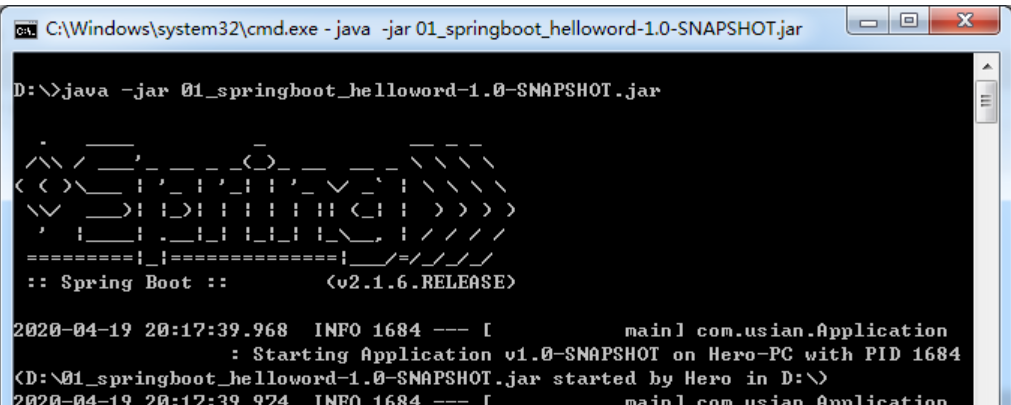
步骤③ : 然后在cmd终端发布项目
运行代码:java -jar xxx.jar 
2,war方式
步骤① 设置打包方式
<packaging>war</packaging>步骤② 设置tomcat启动器的依赖范围———-pom.xml中
<dependency>
  <groupId>org.springframework.boot</groupId>
  <artifactId>spring-boot-starter-tomcat</artifactId>
  <!--tomcat启动器依赖范围-->
  <scope>provided</scope>
</dependency>
步骤③ 修改启动类———-在包com.hg中
@SpringBootApplication
public class Application extends SpringBootServletInitializer {
    @Override
    protected SpringApplicationBuilder configure(SpringApplicationBuilder builder) {
        return builder.sources(Application.class);
    }

    public static void main(String[] args) {
         ... ...
    }
}
——————————04,Spring Boot 异常,单元测试,多环境,日志————————
六,Spring Boot的全局异常处理器
1,前后端不分离(了解)
步骤① 实现接口HandlerExceptionResolver
@Component
public class GlobalExceptionHandler implements HandlerExceptionResolver {
    @Override
    public ModelAndView resolveException(HttpServletRequest httpServletRequest,
                                         HttpServletResponse httpServletResponse,
                                         Object o, Exception e) {
        ModelAndView mv = new ModelAndView();
        mv.addObject("error", e);
        mv.setViewName("exception");
        return mv;
    }
}
步骤② 在resource.templates包中创建exception.html
<!DOCTYPE html>
<html>
<head>
  <meta charset="UTF-8">
  <title>错误提示页面-ArithmeticException</title>
</head>
<body>
出错了,请与管理员联系。。。<br>
<span th:text="${error}"></span>
</body>
</html>
2,前后端分离(重点)
步骤① 注解 @ControllerAdvice
@ExceptionHandler(Exception.class)
@ResponseBody
@ControllerAdvice
public class AjaxGlobalExceptionHandler {

    @ExceptionHandler(Exception.class)
    @ResponseBody
    public Map<String, Object> AjaxGlobalExceptionHandler(){
        Map<String, Object> map = new HashMap<>();
        map.put("status", 500);
        map.put("errorMsg", "出错了,代码有问题");
        return map;
    }
}
二,springboot整合junit
步骤① dao包
@Repository
public class UserDaoImpl {
	public void saveUser(){
		System.out.println("insert into users.....");
	}
}
步骤② service包
@Service
public class UserServiceImpl {

	@Autowired
	private UserDaoImpl userDaoImpl;

	public void addUser(){
		this.userDaoImpl.saveUser();
	}

}
步骤③ 启动类App
@SpringBootApplication
public class App {
    public static void main(String[] args) {
        SpringApplication.run(App.class);
    }
}
步骤④ 整合junit——test.java.com.xx.test.Junit
    /**
     * main方法:
     *      new ClassPathXmlApplicationContext("applicationContext.xml")
     * spring整合junit:
     *      @RunWith(SpringJUnit4ClassRunner.class)
     *      @ContextConfiguration(classes = {"classpath:applicationContext.xml"})
     * springboot整合junit:
     */
    //@RunWith(SpringJUnit4ClassRunner.class)
    //@SpringBootTest(classes = {App.class})


@RunWith(SpringRunner.class)
@SpringBootTest(classes = {App.class})
public class Junit {

    @Autowired
    private UserServiceImpl userServiceimpl;

    @Test
    public void testAddUser(){
        this.userServiceimpl.addUser();
    }
}