Redisson原理


Redisson原理
一、Redisson原理分析

1、加锁机制
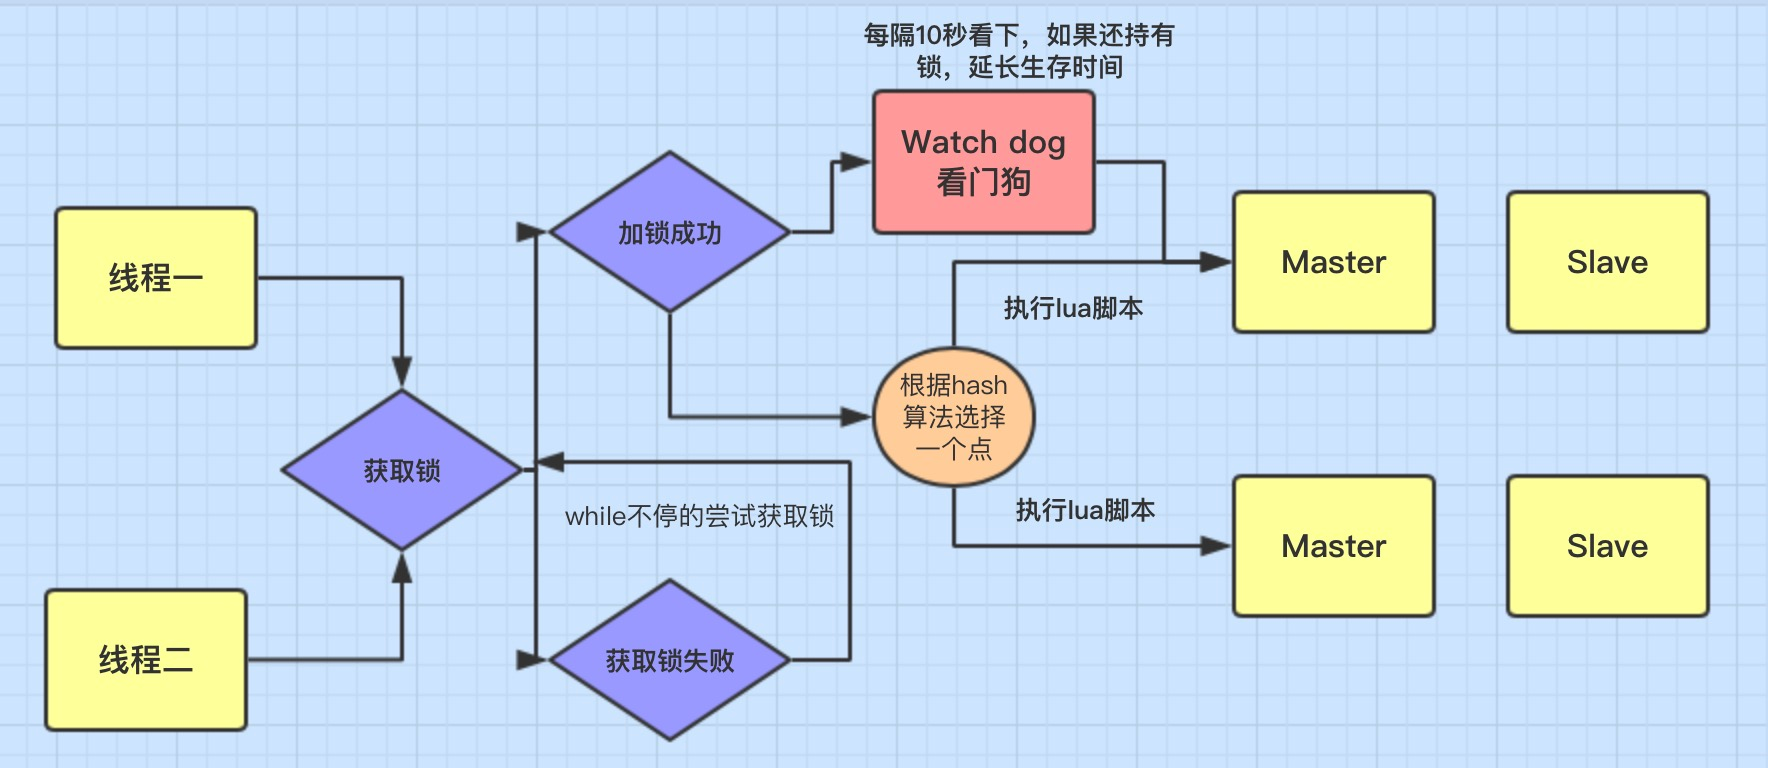
线程去获取锁,获取成功: 执行 lua脚本,保存数据到 redis数据库。
线程去获取锁,获取失败: 一直通过 while循环尝试获取锁,获取成功后,执行 lua脚本,保存数据到 redis数据库。
2、 自动延期机制
在一个分布式环境下,假如一个线程获得锁后,突然服务器宕机了,那么这个时候在一定时间后这个锁会自动释放,你也可以设置锁的有效时间(不设置默认30秒),这样的目的主要是防止死锁的发生。
但在实际开发中会有下面一种情况:
 1 //设置锁1秒过去
 2 redissonLock.lock("redisson", 1);
 3 /** 4  * 业务逻辑需要咨询2秒
 5  */
 6 redissonLock.release("redisson");
 7
 8 /**
 9 * 线程1 进来获得锁后,线程一切正常并没有宕机,但它的业务逻辑需要执行2秒,这就会有个问题,在 线  程1 执行1秒后,这个锁就自动过期了,
 10 * 那么这个时候 线程2 进来了。那么就存在 线程1和线程2 同时在这段业务逻辑里执行代码,这当然是不合理的。
 11 * 而且如果是这种情况,那么在解锁时系统会抛异常,因为解锁和加锁已经不是同一线程了,具体后面代码演示。
 12 */
所以这个时候看门狗就出现了,它的作用就是 线程1 业务还没有执行完,时间就过了,线程1 还想持有锁的话,就会启动一个 watch dog后台线程,不断的延长锁 key的生存时间。注意:正常这个看门狗线程是不启动的,还有就是这个看门狗启动后对整体性能也会有一定影响,所以不建议开启看门狗。
3、为啥要用 lua脚本呢?
这个不用多说,主要是如果你的业务逻辑复杂的话,通过封装在 lua脚本中发送给redis,而且 redis是单线程的,这样就保证这段复杂业务逻辑执行的原子性。
Redis是在2.6推出了脚本功能,允许开发者使用Lua语言编写脚本传到redis执行。使用脚本的好处如下:
1、减少网络开销:本来5次网络请求的操作,可以用一个请求完成,原先5次请求的逻辑,可以一次性放到redis中执行,较少了网络往返时延。这点跟管道有点类似。
2、原子操作:Redis会将整个脚本作为一个整体执行,中间不会被其他命令插入。管道不是原子的,不过redis的批量操作命令(类似mset)是原子的。
也就意味着虽然脚本中有多条redis指令,那即使有多条线程并发执行,在同一时刻也只有一个线程能够执行这段逻辑,等这段逻辑执行完,分布式锁也就获取到了,其它线程再进来就获取不到分布式锁了。
4、可重入加锁机制
Redisson可以实现可重入加锁机制的原因,我觉得跟两点有关:
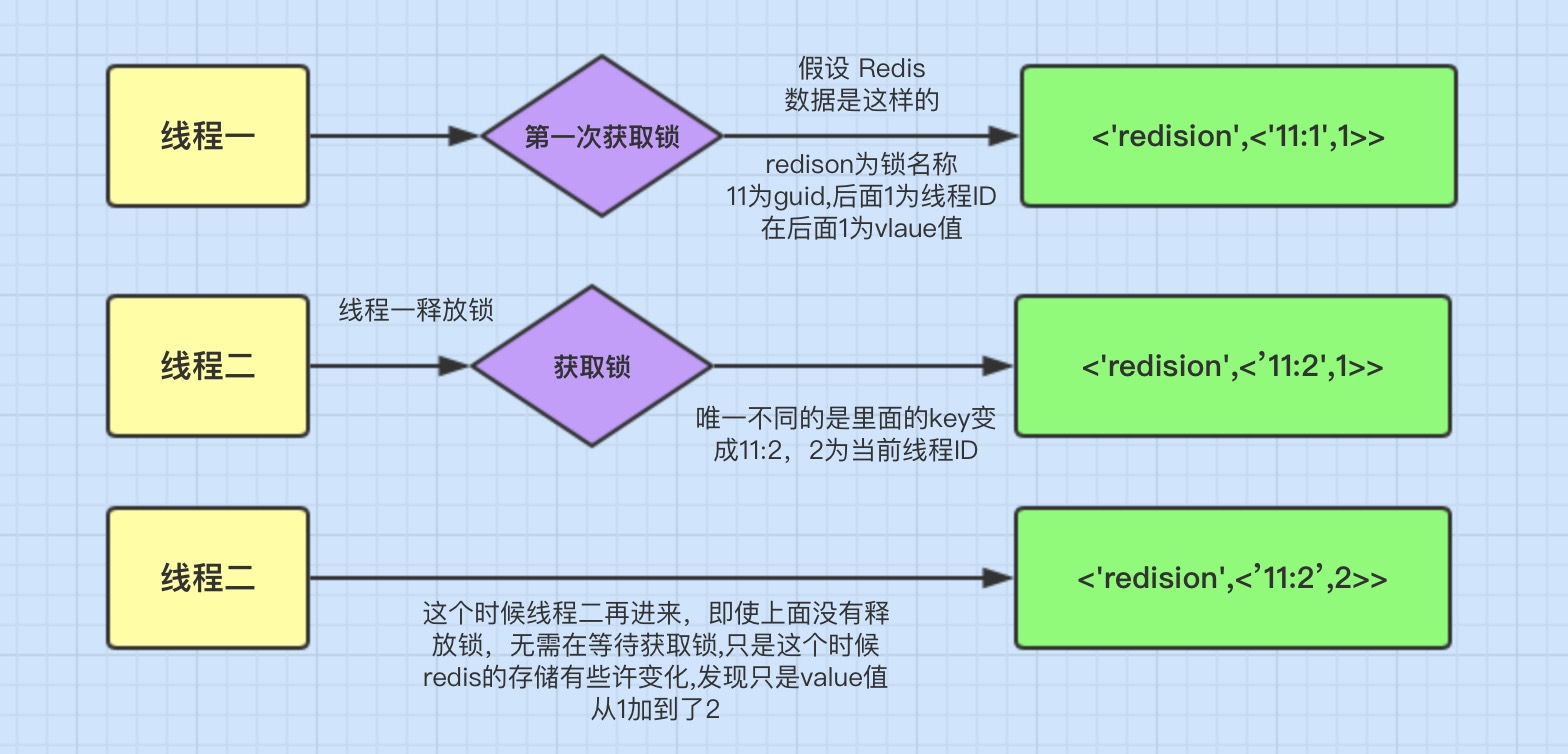
1、Redis存储锁的数据类型是 Hash类型
2、Hash数据类型的key值包含了当前线程信息。
下面是redis存储的数据

这里表面数据类型是 Hash类型,Hash类型相当于我们 java的 <key,<key1,value» 类型,这里key是指 ‘redisson’
它的有效期还有9秒,我们再来看里们的 key值为 078e44a3-5f95-4e24-b6aa-80684655a15a:45它的组成是:
guid + 当前线程的ID。后面的 value是就和可重入加锁有关。

上面这图的意思就是可重入锁的机制,它最大的优点就是相同线程不需要在等待锁,而是可以直接进行相应操作。
5、Redis分布式锁的缺点
Redis分布式锁会有个缺陷,就是在 Redis哨兵模式下:
客户端1 对某个master节点写入了 redisson锁,此时会异步复制给对应的 slave节点。但是这个过程中一旦发生 master节点宕机,主备切换,slave节点从变为了 master节点。
这时客户端2 来尝试加锁的时候,在新的 master节点上也能加锁,此时就会导致多个客户端对同一个分布式锁完成了加锁。
这时系统在业务语义上一定会出现问题,导致各种脏数据的产生。
缺陷在哨兵模式或者主从模式下,如果 master实例宕机的时候,可能导致多个客户端同时完成加锁。
二、RLock
1、加锁操作
RLock是Redisson分布式锁的最核心接口,继承了concurrent包的Lock接口和自己的RLockAsync接口,RLockAsync的返回值都是RFuture,是Redisson执行异步实现的核心逻辑,也是Netty发挥的主要阵地。
从RLock进入,找到RedissonLock类,找到 tryLock 方法再递进到干活的tryAcquireOnceAsync 方法,这是加锁的主要代码
private RFuture<Boolean> tryAcquireOnceAsync(long waitTime, long leaseTime, TimeUnit unit, long threadId) {
        if (leaseTime != -1L) {
            return this.tryLockInnerAsync(waitTime, leaseTime, unit, threadId, RedisCommands.EVAL_NULL_BOOLEAN);
        } else {
            RFuture<Boolean> ttlRemainingFuture = this.tryLockInnerAsync(waitTime, this.commandExecutor.getConnectionManager().getCfg().getLockWatchdogTimeout(), TimeUnit.MILLISECONDS, threadId, RedisCommands.EVAL_NULL_BOOLEAN);
            ttlRemainingFuture.onComplete((ttlRemaining, e) -> {
                if (e == null) {
                    if (ttlRemaining) {
                        this.scheduleExpirationRenewal(threadId);
                    }

                }
            });
            return ttlRemainingFuture;
        }
    }
此处出现leaseTime时间判断的2个分支,实际上就是加锁时是否设置过期时间,未设置过期时间(-1)时则会有watchDog 的锁续约 (下文),一个注册了加锁事件的续约任务。我们先来看有过期时间tryLockInnerAsync 部分,
evalWriteAsync是eval命令执行lua的入口
<T> RFuture<T> tryLockInnerAsync(long leaseTime, TimeUnit unit, long threadId, RedisStrictCommand<T> command) {
        this.internalLockLeaseTime = unit.toMillis(leaseTime);
        return this.commandExecutor.evalWriteAsync(this.getName(), LongCodec.INSTANCE, command, "if (redis.call('exists', KEYS[1]) == 0) then redis.call('hset', KEYS[1], ARGV[2], 1); redis.call('pexpire', KEYS[1], ARGV[1]); return nil; end; if (redis.call('hexists', KEYS[1], ARGV[2]) == 1) then redis.call('hincrby', KEYS[1], ARGV[2], 1); redis.call('pexpire', KEYS[1], ARGV[1]); return nil; end; return redis.call('pttl', KEYS[1]);", Collections.singletonList(this.getName()), new Object[]{this.internalLockLeaseTime, this.getLockName(threadId)});
}这里只有一个明显的监听方法onMessage,其订阅和信号量的释放都在父类PublishSubscribe,我们只关注监听事件的实际操作
protected void onMessage(RedissonLockEntry value, Long message) {
    Runnable runnableToExecute;
     if (message.equals(unlockMessage)) {
         // 从监听器队列取监听线程执行监听回调
         runnableToExecute = (Runnable)value.getListeners().poll();
         if (runnableToExecute != null) {
             runnableToExecute.run();
         }
         // getLatch()返回的是Semaphore,信号量,此处是释放信号量
         // 释放信号量后会唤醒等待的entry.getLatch().tryAcquire去再次尝试申请锁
         value.getLatch().release();
     } else if (message.equals(readUnlockMessage)) {
         while(true) {
             runnableToExecute = (Runnable)value.getListeners().poll();
             if (runnableToExecute == null) {
                 value.getLatch().release(value.getLatch().getQueueLength());
                 break;
             }
             runnableToExecute.run();
         }
     }
}发现一个是默认解锁消息 ,一个是读锁解锁消息 ,因为redisson是有提供读写锁的,而读写锁读读情况和读写、写写情况互斥情况不同,我们只看上面的默认解锁消息unlockMessage分支
Redisson通过LockPubSub 监听解锁消息,执行监听回调和释放信号量通知等待线程可以重新抢锁。
这时再回来看tryAcquireOnceAsync另一分支
private RFuture<Boolean> tryAcquireOnceAsync(long waitTime, long leaseTime, TimeUnit unit, long threadId) {
        if (leaseTime != -1L) {
            return this.tryLockInnerAsync(waitTime, leaseTime, unit, threadId, RedisCommands.EVAL_NULL_BOOLEAN);
        } else {
            RFuture<Boolean> ttlRemainingFuture = this.tryLockInnerAsync(waitTime, this.commandExecutor.getConnectionManager().getCfg().getLockWatchdogTimeout(), TimeUnit.MILLISECONDS, threadId, RedisCommands.EVAL_NULL_BOOLEAN);
            ttlRemainingFuture.onComplete((ttlRemaining, e) -> {
                if (e == null) {
                    if (ttlRemaining) {
                        this.scheduleExpirationRenewal(threadId);
                    }

                }
            });
            return ttlRemainingFuture;
        }
    }
3、锁续约
查看RedissonLock.this.scheduleExpirationRenewal(threadId)
private void scheduleExpirationRenewal(long threadId) {
        RedissonLock.ExpirationEntry entry = new RedissonLock.ExpirationEntry();
        RedissonLock.ExpirationEntry oldEntry = (RedissonLock.ExpirationEntry)EXPIRATION_RENEWAL_MAP.putIfAbsent(this.getEntryName(), entry);
        if (oldEntry != null) {
            oldEntry.addThreadId(threadId);
        } else {
            entry.addThreadId(threadId);
            this.renewExpiration();
        }

    }

private void renewExpiration() {
        RedissonLock.ExpirationEntry ee = (RedissonLock.ExpirationEntry)EXPIRATION_RENEWAL_MAP.get(this.getEntryName());
        if (ee != null) {
            Timeout task = this.commandExecutor.getConnectionManager().newTimeout(new TimerTask() {
                public void run(Timeout timeout) throws Exception {
                    RedissonLock.ExpirationEntry ent = (RedissonLock.ExpirationEntry)RedissonLock.EXPIRATION_RENEWAL_MAP.get(RedissonLock.this.getEntryName());
                    if (ent != null) {
                        Long threadId = ent.getFirstThreadId();
                        if (threadId != null) {
                            RFuture<Boolean> future = RedissonLock.this.renewExpirationAsync(threadId);
                            future.onComplete((res, e) -> {
                                if (e != null) {
                                    RedissonLock.log.error("Can't update lock " + RedissonLock.this.getName() + " expiration", e);
                                } else {
                                    if (res) {
                                        RedissonLock.this.renewExpiration();
                                    }

                                }
                            });
                        }
                    }
                }
            }, this.internalLockLeaseTime / 3L, TimeUnit.MILLISECONDS);
            ee.setTimeout(task);
        }
    }
拆分来看,这段连续嵌套且冗长的代码实际上做了几步:
- 添加一个netty的Timeout回调任务,每(internalLockLeaseTime / 3)毫秒执行一次,执行的方法是renewExpirationAsync
- renewExpirationAsync重置了锁超时时间,又注册一个监听器,监听回调又执行了renewExpiration
renewExpirationAsync 的Lua如下
protected RFuture<Boolean> renewExpirationAsync(long threadId) {
        return this.commandExecutor.evalWriteAsync(this.getName(), LongCodec.INSTANCE, RedisCommands.EVAL_BOOLEAN, "if (redis.call('hexists', KEYS[1], ARGV[2]) == 1) then redis.call('pexpire', KEYS[1], ARGV[1]); return 1; end; return 0;", Collections.singletonList(this.getName()), new Object[]{this.internalLockLeaseTime, this.getLockName(threadId)});
    }

if (redis.call('hexists', KEYS[1], ARGV[2]) == 1) then
  redis.call('pexpire', KEYS[1], ARGV[1]);
  return 1;
end;
return 0;
4、流程概括
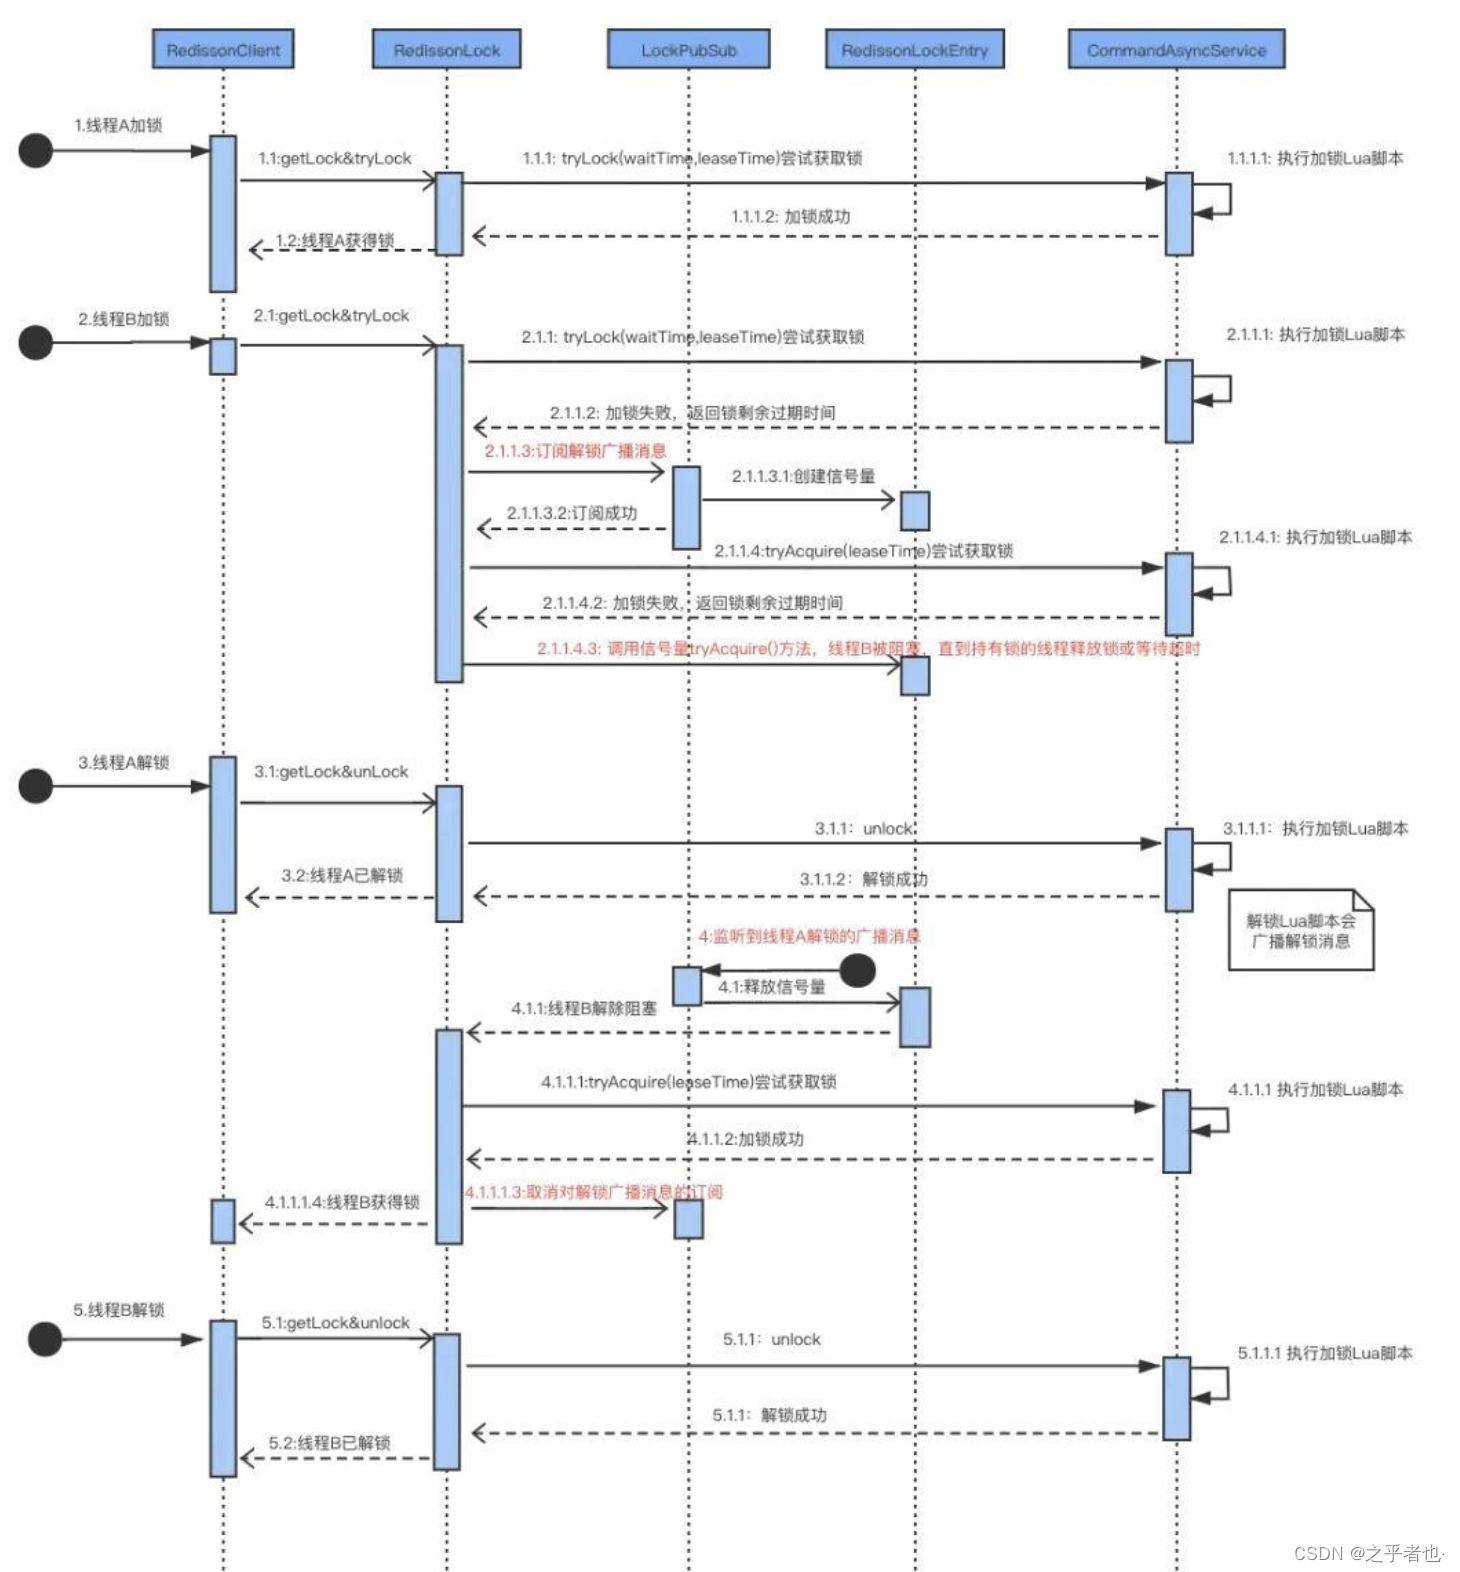
通过整体的介绍,流程简单概括:
- A、B线程争抢一把锁,A获取到后,B阻塞
- B线程阻塞时并非主动
CAS,而是PubSub方式订阅该锁的广播消息 - A操作完成释放了锁,B线程收到订阅消息通知
- B被唤醒开始继续抢锁,拿到锁
详细加锁解锁流程总结如下图:

