第12章-IoT产品设备管理


第12章 IoT产品设备管理
第12章 IoT产品设备管理
学习目标
- 能够熟悉华为云IoTDA平台的特点
- 能够掌握华为云IoTDA平台的一些概念,如:产品、设备、物模型等
- 能够掌握使用华为云IoTDA平台提供的接口创建设备,并绑定业务数据(老人、位置)
- 能够熟悉智能设备对接华为云IoTDA平台上报数据的方式
华为云IoTDA平台概述
IoT简介
IoT:物联网是指通过信息传感设备,按约定的协议,将任何物体与网络相连接,物体通过信息传播媒介进行信息交换和通信,以实现智能化识别、定位、跟踪、监管等功能。
IoT常见的应用场景:
- 共享充电宝
- 智能音箱
- 智能家居
- 智能农耕
- 智能医疗
华为云IoTDA平台简介
IoTDA(Internet of Thing Device Access):是一种物联网的设备接入服务,是华为云的物联网平台。
IoTDA的作用:
- 将用户的设备数据进行安全、可靠、高效的运输。
- 将设备集中管理,数据采集和分析来支撑上层应用。
华为云官网:
IoTDA平台的概念(产品、设备、物模型)
下面的图展示了 freeStandardInstance平台实例、产品、设备、物模型、服务、属性及命令之间的层级和包含关系。
FREESTANDARDINSTANCE
string
instanceId
PK
实例ID
string
instanceName
实例名称
PRODUCT
string
productId
PK
产品ID
string
productName
产品名称
string
instanceId
FK
关联实例ID
DEVICE
string
deviceId
PK
设备ID
string
deviceName
设备名称
string
productId
FK
关联产品ID
THINGMODEL
string
modelId
PK
物模型ID
string
productId
FK
关联产品ID
SERVICE
string
serviceId
PK
服务ID
string
serviceName
服务名称
string
modelId
FK
关联物模型ID
PROPERTY
string
propertyId
PK
属性ID
string
propertyName
属性名称
string
serviceId
FK
关联服务ID
COMMAND
string
commandId
PK
命令ID
string
commandName
命令名称
string
serviceId
FK
关联服务ID
拥有
包含
定义
提供
包含
包含
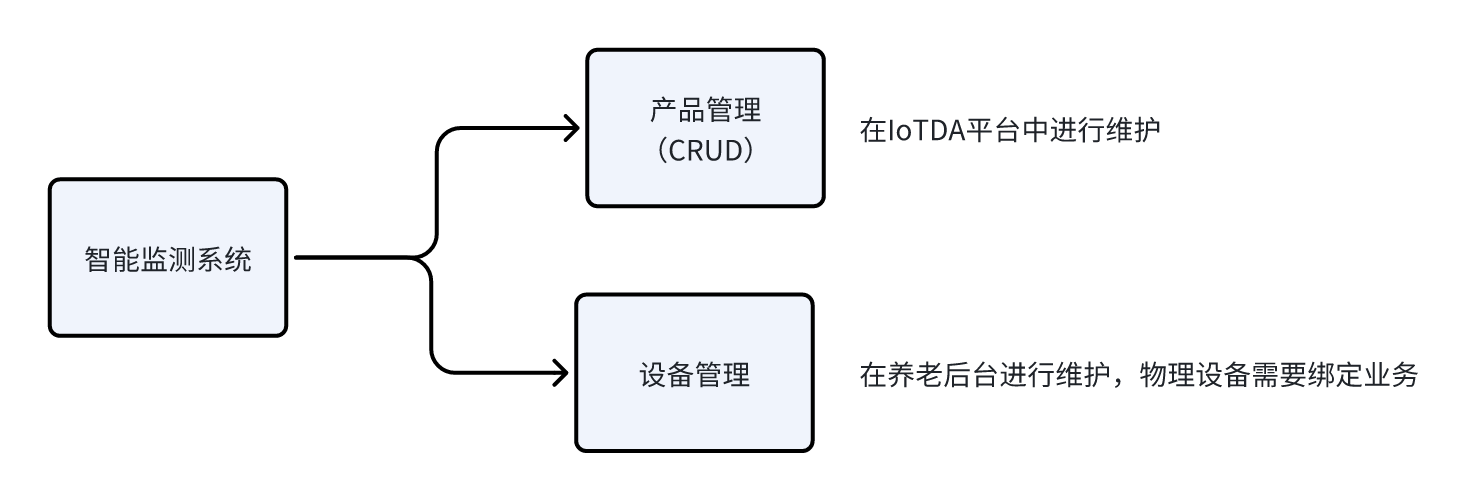
如何创建设备并绑定业务数据
后台管理系统中,需要咱们自己维护设备,不需要创建产品,因为产品直接在物联网平台创建添加即可。
需要单独维护设备的原因是:设备需要与业务对象进行绑定。
如下图所示:

如何上报数据(虚拟IoT设备)
1)在开发阶段可以使用联网的电脑,来模拟设备的数据上报,官方 下载(github远程仓库)
2)解压之后,使用idea打开,找到iot-device-demo模块中的PropertySample类
3)修改代码中的接入地址、设备id、设备密钥、物模型属性数据设置、物模型serviceId,即可上报数据。
package com.huaweicloud.sdk.iot.device.demo.device;

import com.huaweicloud.sdk.iot.device.IoTDevice;
import com.huaweicloud.sdk.iot.device.client.requests.ServiceProperty;
import com.huaweicloud.sdk.iot.device.transport.ActionListener;

import org.apache.logging.log4j.LogManager;
import org.apache.logging.log4j.Logger;

import java.io.File;
import java.io.IOException;
import java.io.InputStream;
import java.nio.file.Files;
import java.security.SecureRandom;
import java.util.Arrays;
import java.util.HashMap;
import java.util.List;
import java.util.Map;
import java.util.Random;

import static java.nio.file.StandardCopyOption.REPLACE_EXISTING;

/**
 * 演示如何直接使用DeviceClient进行设备属性的上报和读写
 */
public class PropertySample {

    private static final String IOT_ROOT_CA_RES_PATH = "ca.jks";

    private static final String IOT_ROOT_CA_TMP_PATH = "huaweicloud-iotda-tmp-" + IOT_ROOT_CA_RES_PATH;

    private static final Logger log = LogManager.getLogger(PropertySample.class);

    public static void main(String[] args) throws InterruptedException, IOException {

        // 加载iot平台的ca证书,进行服务端校验
        File tmpCAFile = new File(IOT_ROOT_CA_TMP_PATH);
        try (InputStream resource = CommandSample.class.getClassLoader().getResourceAsStream(IOT_ROOT_CA_RES_PATH)) {
            Files.copy(resource, tmpCAFile.toPath(), REPLACE_EXISTING);
        }

        // 创建设备并初始化. 用户请替换为自己的接入地址。-->watch01
        IoTDevice device = new IoTDevice(
            // 接入地址获取方式:登录华为云IoTDA控制台左侧导航栏“总览”页签,在选择的实例基本信息中,单击“接入信息”-->设备接入-->MQTT。选择8883端
            "ssl://230590aa95.st1.iotda-device.cn-east-3.myhuaweicloud.com:8883",
            // 设备id
            "67ab39f1bab900244b1e64a6_watch01",
            // 设备秘钥  设备创建成功后会自动生成
            "5f71b853642b8ccab767890a5b148f02", tmpCAFile);
        if (device.init() != 0) {
            return;
        }

        /*// 接收平台下发的属性读写     注释掉,用不到
        device.getClient().setPropertyListener(new PropertyListener() {
            // 处理写属性
            @Override
            public void onPropertiesSet(String requestId, List<ServiceProperty> services) {
                // 遍历service
                for (ServiceProperty serviceProperty : services) {
                    log.info("OnPropertiesSet, serviceId is {}", serviceProperty.getServiceId());
                    // 遍历属性
                    for (String name : serviceProperty.getProperties().keySet()) {
                        log.info("property name is {}", name);
                        log.info("set property value is {}", serviceProperty.getProperties().get(name));
                    }
                }
                // 修改本地的属性值
                device.getClient().respondPropsSet(requestId, IotResult.SUCCESS);
            }

            *//**
             * 处理读属性。多数场景下,用户可以直接从平台读设备影子,此接口不用实现。
             * 但如果需要支持从设备实时读属性,则需要实现此接口。
             *//*
            @Override
            public void onPropertiesGet(String requestId, String serviceId) {
                log.info("OnPropertiesGet, the serviceId is {}", serviceId);
                Map<String, Object> json = new HashMap<>();
                Random rand = new SecureRandom();
                json.put("alarm", 1);
                json.put("temperature", rand.nextFloat() * 100.0f);
                json.put("humidity", rand.nextFloat() * 100.0f);
                json.put("smokeConcentration", rand.nextFloat() * 100.0f);

                ServiceProperty serviceProperty = new ServiceProperty();
                serviceProperty.setProperties(json);
                serviceProperty.setServiceId("smokeDetector");

                device.getClient().respondPropsGet(requestId, Arrays.asList(serviceProperty));
            }
        });*/

        // 定时上报属性
        while (true) {

            Map<String, Object> json = new HashMap<>();
            Random rand = new SecureRandom();

            // 按照物模型设置属性,根据实际情况设置,下面是智能报警手表的物模型
            json.put("BodyTemp", 36);
            json.put("xueyang", rand.nextFloat()*100.0f);
            json.put("HeartRate", rand.nextFloat()*100.0f);
            json.put("BatteryPercentage", rand.nextFloat() * 100.0f);

            ServiceProperty serviceProperty = new ServiceProperty();
            serviceProperty.setProperties(json);
            serviceProperty.setServiceId("watch_services"); // serviceId要和物模型一致

            device.getClient().reportProperties(Arrays.asList(serviceProperty), new ActionListener() {
                @Override
                public void onSuccess(Object context) {
                    log.info("pubMessage success");
                }

                @Override
                public void onFailure(Object context, Throwable var2) {
                    log.error("reportProperties failed" + var2.toString());
                }
            });

            Thread.sleep(10000);
        }
    }
}
数据库表设计-设备表
因为需要在本地维护设备数据,所以创建设备表。
设备表的表结构如下:
DEVICE
int
id
PK
主键ID
string
iot_id
物联网设备ID
string
secret
设备秘钥
string
binding_location
绑定位置
int
location_type
位置类型: 0-随身设备, 1-固定设备
int
physical_location_type
物理位置类型: 0-楼层, 1-房间, 2-床位
string
device_name
设备名称
string
nickname
备注名称
string
product_key
产品key
string
product_name
产品名称
string
device_description
位置备注
int
have_entrance_guard
是否包含门禁: 0-否, 1-是
datetime
create_time
创建时间
datetime
update_time
更新时间
int
create_by
创建人id
int
node_id
节点id
int
update_by
更新人id
string
remark
备注
接口设计-设备管理
依据需求分析和页面原型,在养老系统中需要维护设备数据,咱们需要开发以下接口:
- 从物联网平台同步产品列表
- 查询所有产品列表
- 注册设备
- 分页查询设备列表
- 查询设备详细数据
- 查看设备上报的数据
- 修改设备备注名称
- 删除设备
- 分页查询设备服务调用数据
分析完大概有这些接口之后,就进行接口文档的详细编写。
功能实现-设备管理
环境集成-IoT平台
集成方式:
在zzyl-framework模块导入依赖
<dependency>
    <groupId>com.huaweicloud.sdk</groupId>
    <artifactId>huaweicloud-sdk-core</artifactId>
    <version>3.1.76</version>
</dependency>
<dependency>
    <groupId>com.huaweicloud.sdk</groupId>
    <artifactId>huaweicloud-sdk-iotda</artifactId>
    <version>3.1.76</version>
</dependency>
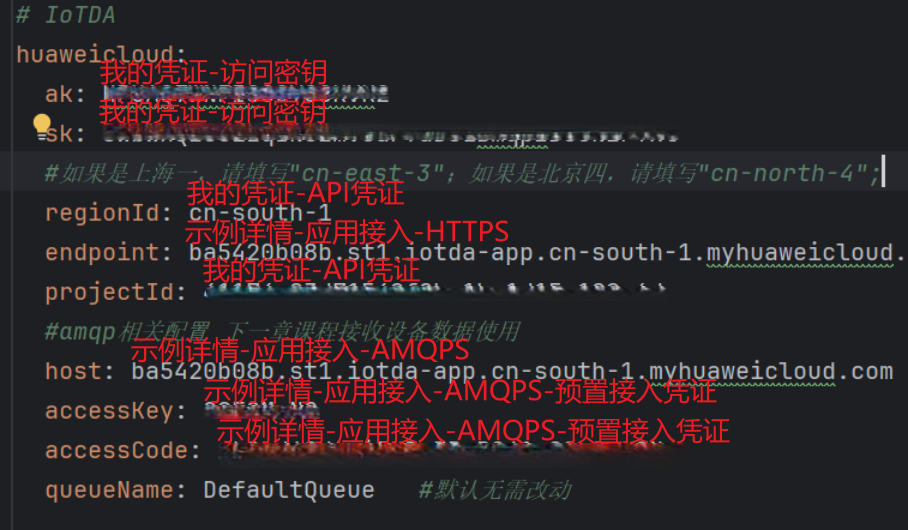
在zzyl-admin模块中的application-dev.yml文件中添加关于IOT的配置如下:
huaweicloud:
  ak: UTVLYVJKFVGYVEFFWG
  sk: WkEWqfwZoFlLwbR5Kq5NmWTLmj71WhRXe
  #如果是上海一,请填写"cn-east-3";如果是北京四,请填写"cn-north-4";
  regionId: cn-east-3
  endpoint: 38e7abf.st1.iotda-app.cn-east-3.myhuaweicloud.com
  projectId: 57ee9b4c827a44cb94319a077f0fe7cb
  #amqp相关配置 下一章课程接收设备数据使用
  host: 38e7abedbf.st1.iotda-app.cn-east-3.myhuaweicloud.com
  accessKey: S25ZeTC5
  accessCode: a4fKpE5zbk0nbGNJU0d1bKkJNRZxQzlp
  queueName: DefaultQueue   #默认无需改动
在zzyl-framework中新增HuaWeiIotConfigProperties 来读取配置文件
package com.zzyl.framework.config.properties;

import lombok.Data;
import lombok.NoArgsConstructor;
import org.springframework.boot.context.properties.ConfigurationProperties;
import org.springframework.context.annotation.Configuration;

import java.util.Map;

/**
 * @author peterpeng
 */

@Data
@NoArgsConstructor
@Configuration
@ConfigurationProperties(prefix = "huaweicloud")
public class HuaWeiIotConfigProperties {

    /**
     * 访问Key
     */
    private String ak;

    /**
     * 访问秘钥
     */
    private String sk;

    /**
     * 区域id
     */
    private String regionId;

    /**
     * 应用侧https接入地址
     */
    private String endpoint;

    /**
     * 项目id
     */
    private String projectId;

    /**
     * 应用侧amqp接入地址
     */
    private String host;

    /**
     * amqp连接端口
     */
    private int port = 5671;

    /**
     * amqp接入凭证键值
     */
    private String accessKey;

    /**
     * amqp接入凭证密钥
     */
    private String accessCode;

    // 指定单个进程启动的连接数
    // 单个连接消费速率有限,请参考使用限制,最大64个连接
    // 连接数和消费速率及rebalance相关,建议每500QPS增加一个连接
    //可根据实际情况自由调节,目前测试和正式环境资源有限,限制更改为4
    private int connectionCount = 4;

    /**
     * 队列名称
     */
    private String queueName;

    /**
     * 开门命令所属服务id
     */
    private String smartDoorServiceId;

    /**
     * 开门记录属性
     */
    private String doorOpenPropertyName;

    /**
     * 开门命令
     */
    private String doorOpenCommandName;

    /**
     * 设置临时密码命令
     */
    private String passwordSetCommandName;

    /**
     * 仅支持true
     */
    private boolean useSsl = true;

    /**
     * IoTDA仅支持default
     */
    private String vhost = "default";

    /**
     * IoTDA仅支持PLAIN
     */
    private String saslMechanisms = "PLAIN";

    /**
     * true: SDK自动ACK(默认)
     * false:收到消息后,需要手动调用message.acknowledge()
     */
    private boolean isAutoAcknowledge = true;

    /**
     * 重连时延(ms)
     */
    private long reconnectDelay = 3000L;

    /**
     * 最大重连时延(ms),随着重连次数增加重连时延逐渐增加
     */
    private long maxReconnectDelay = 30 * 1000L;

    /**
     * 最大重连次数,默认值-1,代表没有限制
     */
    private long maxReconnectAttempts = -1;

    /**
     * 空闲超时,对端在这个时间段内没有发送AMQP帧则会导致连接断开。默认值为30000。单位:毫秒。
     */
    private long idleTimeout = 30 * 1000L;

    /**
     * The values below control how many messages the remote peer can send to the client and be held in a pre-fetch buffer for each consumer instance.
     */
    private int queuePrefetch = 1000;

    /**
     * 扩展参数
     */
    private Map<String, String> extendedOptions;
}
在zzyl-framework中添加如下配置:
package com.zzyl.framework.config;

import com.huaweicloud.sdk.core.auth.BasicCredentials;
import com.huaweicloud.sdk.core.auth.ICredential;
import com.huaweicloud.sdk.core.region.Region;
import com.huaweicloud.sdk.iotda.v5.IoTDAClient;
import com.zzyl.framework.config.properties.HuaWeiIotConfigProperties;
import org.springframework.beans.factory.annotation.Autowired;
import org.springframework.context.annotation.Bean;
import org.springframework.context.annotation.Configuration;

@Configuration
public class IotClientConfig {

    @Autowired
    private HuaWeiIotConfigProperties huaWeiIotConfigProperties;

    @Bean
    public IoTDAClient huaWeiIotInstance() {
        ICredential auth = new BasicCredentials()
                .withAk(huaWeiIotConfigProperties.getAk())
                .withSk(huaWeiIotConfigProperties.getSk())
                // 标准版/企业版需要使用衍生算法,基础版请删除配置"withDerivedPredicate"
                .withDerivedPredicate(BasicCredentials.DEFAULT_DERIVED_PREDICATE)
                .withProjectId(huaWeiIotConfigProperties.getProjectId());

        return IoTDAClient.newBuilder()
                .withCredential(auth)
                // 标准版/企业版:需自行创建Region对象,基础版:请使用IoTDARegion的region对象,如"withRegion(IoTDARegion.CN_NORTH_4)"
                .withRegion(new Region(huaWeiIotConfigProperties.getRegionId(), huaWeiIotConfigProperties.getEndpoint()))
                // .withRegion(IoTDARegion.CN_NORTH_4)
                .build();
    }
}
测试,在zzyl-admin模块下创建单元测试,查询产品列表,
详细代码如下:
package com.zzyl.test;

import com.huaweicloud.sdk.iotda.v5.IoTDAClient;
import com.huaweicloud.sdk.iotda.v5.model.ListProductsRequest;
import com.huaweicloud.sdk.iotda.v5.model.ListProductsResponse;
import com.huaweicloud.sdk.iotda.v5.model.Page;
import com.huaweicloud.sdk.iotda.v5.model.ProductSummary;
import org.junit.jupiter.api.Test;
import org.springframework.beans.factory.annotation.Autowired;
import org.springframework.boot.test.context.SpringBootTest;

import java.util.List;

@SpringBootTest
public class IoTDeviceTest {


    @Autowired
    private IoTDAClient client;

    /**
     * 查询公共实例下的所有产品
     * @throws Exception
     */
    @Test
    public void selectProduceList() throws Exception {
        ListProductsRequest listProductsRequest = new ListProductsRequest();
        listProductsRequest.setLimit(50);
        ListProductsResponse response = client.listProducts(listProductsRequest);
        List<ProductSummary> products = response.getProducts();
        System.out.println(products);
    }

}
环境集成-Redis
若依框架一般都集成了Redis相关依赖
<dependency>
    <groupId>org.springframework.boot</groupId>
    <artifactId>spring-boot-starter-test</artifactId>
</dependency>
在目前的若依框架中,就是使用Redis来作为缓存的,核心配置类如下:
- 在zzyl-framework模块中的com.zzyl.framework.config.RedisConfig类
- 作用:配置类,开启了缓存注解、对象序列化和反序列化
package com.zzyl.framework.config;

import org.springframework.cache.annotation.CachingConfigurerSupport;
import org.springframework.cache.annotation.EnableCaching;
import org.springframework.context.annotation.Bean;
import org.springframework.context.annotation.Configuration;
import org.springframework.data.redis.connection.RedisConnectionFactory;
import org.springframework.data.redis.core.RedisTemplate;
import org.springframework.data.redis.core.script.DefaultRedisScript;
import org.springframework.data.redis.serializer.StringRedisSerializer;

/**
 * redis配置
 *
 * @author ruoyi
 */
@Configuration
@EnableCaching
public class RedisConfig extends CachingConfigurerSupport
{
    @Bean
    @SuppressWarnings(value = { "unchecked", "rawtypes" })
    public RedisTemplate<Object, Object> redisTemplate(RedisConnectionFactory connectionFactory)
    {
        RedisTemplate<Object, Object> template = new RedisTemplate<>();
        template.setConnectionFactory(connectionFactory);

        FastJson2JsonRedisSerializer serializer = new FastJson2JsonRedisSerializer(Object.class);

        // 使用StringRedisSerializer来序列化和反序列化redis的key值
        template.setKeySerializer(new StringRedisSerializer());
        template.setValueSerializer(serializer);

        // Hash的key也采用StringRedisSerializer的序列化方式
        template.setHashKeySerializer(new StringRedisSerializer());
        template.setHashValueSerializer(serializer);

        template.afterPropertiesSet();
        return template;
    }
}
基础代码准备
按照之前的思路,咱们使用代码生成的功能来生成代码
- 包名:
com.zzyl.nursing - 模块名:
nursing
1)跟据表结构和代码模板进行基础代码的生成,只拷贝后端代码到idea中。
2)同时删除Controller层中除了list方法之外的其他方法,代码如下:
/**
 * 智能设备Controller
 *
 * @author peterpeng
 * @date 2025-06-20
 */
@RestController
@RequestMapping("/nursing/device")
@Api(tags = "智能设备的接口")
public class DeviceController extends BaseController
{
    @Autowired
    private IDeviceService deviceService;

    /**
     * 查询设备列表
     */
    @PreAuthorize("@ss.hasPermi('elder:device:list')")
    @GetMapping("/list")
    @ApiOperation("查询设备列表")
    public TableDataInfo list(Device device) {
        startPage();
        List<Device> list = deviceService.selectDeviceList(device);
        return getDataTable(list);
    }


}
修改设备
思路分析
- 先修改IoTDA平台上的设备名称
- 再修改本地存储的设备信息
- 注意:修改之后,不能在同一个位置绑定同一个产品
可在
Sevice层进行校验逻辑 或者 数据库层面用唯一索引达成校验:不能在同一个位置绑定同一个产品。
编码实现
Controller层:
@ApiOperation("修改设备")
@PutMapping
public AjaxResult editDevice(@RequestBody Device device){
    return toAjax(deviceService.updateDeviceWithIoT(device));
}
Service层:
	/**
     * 修改设备信息
     *
     * @param device
     */
@Override
public int updateDeviceWithIoT(Device device) {
    // 0、不能在同一位置绑定多个设备(同一产品) --> 数据库层面建立的唯一索引达到了相同的效果
    //        long count = count(Wrappers.<Device>lambdaQuery()
    //                .eq(Device::getProductKey, device.getProductKey())
    //                .eq(Device::getBindingLocation, device.getBindingLocation())
    //                .eq(Device::getLocationType, device.getLocationType())
    //                .eq(device.getPhysicalLocationType() != null, Device::getPhysicalLocationType, device.getPhysicalLocationType()));
    //        if(count > 0){
    //            throw new BaseException("该老人/位置已绑定该产品,请重新选择");
    //        }

    // 1、修改IoTDA的设备信息
    UpdateDeviceRequest request = new UpdateDeviceRequest();
    request.withDeviceId(device.getIotId());

    UpdateDevice body = new UpdateDevice();
    AuthInfoWithoutSecret authInfobody = new AuthInfoWithoutSecret();
    authInfobody.withSecureAccess(true);
    body.withAuthInfo(authInfobody);
    body.withDeviceName(device.getDeviceName());
    request.withBody(body);
    try {
        client.updateDevice(request);
    } catch (Exception e) {
        e.printStackTrace();
        throw new BaseException("调用IoTDA平台 - 修改设备失败");
    }

    // 2、修改本地存储的设备信息
    int flag;
    try {
        flag = updateDevice(device);
    } catch (Exception e) {
        throw new BaseException("该老人/位置已绑定该类型产品,请重新选择绑定位置");
    }
    return flag;
}
删除设备
思路分析
- 先从IoTDA平台删除设备
- 再删除本地存储的设备
参考接口文档和华为云官方的第三方的接口调用文档
编码实现
Controller层:
@ApiOperation("删除设备")
@DeleteMapping("/{iotId}")
public AjaxResult deleteDevice(@PathVariable("iotId") String iotId){
    return toAjax(deviceService.deleteDevice(iotId));
}
Service层:
	/**
     * 删除设备信息
     *
     * @param iotId
     * @return
     */
@Override
public int deleteDevice(String iotId) {
    // 1、删除 IoTDA 上的设备信息
    DeleteDeviceRequest request = new DeleteDeviceRequest();
    request.withDeviceId(iotId);
    try {
        DeleteDeviceResponse response = client.deleteDevice(request);
        System.out.println(response.toString());
    } catch (Exception e) {
        e.printStackTrace();
        throw new BaseException("调用IoT平台 - 设备删除失败");
    }

    // 2、删除本地的设备信息
    return remove(Wrappers.<Device>lambdaUpdate().eq(Device::getIotId, iotId)) ? 1 : 0;
}
总结
Controller 层的 tips
查询的接口返回交互数据用 return AjavResult.success(data); 。
新增、删除、修改的接口返回交互数据用 return AjaxResult.toAjax(row);
HTTP请求
一个HTTP请求(请求标头)包含以下部分:
- 请求行:
- 请求方法:GET、POST、DELETE、PUT等。
- 请求url
- 请求版本:HTTP/1.1
- 请求头:元数据信息。
- 请求体(可选):包含实际数据(表单数据、JSON数据等)。
