轴承齿轮箱故障诊断系统AI模型部署


轴承齿轮箱故障诊断系统(AI模型部署)
1.摘要
本文基于山东科技大学公开轴承数据集提出了一套“可部署AI模型的LabVIEW 轴承故障诊断系统”。
首先,LabVIEW 端构建了可视化、可交互的智能诊断平台。系统能够加载本地振动信号数据,调用训练好的AI模型进行轴承或齿轮箱等故障识别与状态判断。界面集成信号时域监测、快速傅里叶变换(FFT)频谱分析和功率谱密度(PSD)计算,能够全面展示信号在时域与频域的特征。系统支持均值、标准差、方差、偏度、峭度等多种时域特征自动提取,并通过直方图直观显示。诊断结果可反馈设备运行状态,提供正常/故障报警提示。该系统实现了数据处理、特征分析与智能诊断的一体化,具有跨平台融合、智能化、可扩展和可视化直观等特点,适用于轴承、齿轮箱旋转机械设备的状态监测与健康管理。
其次,描述了山科的电机试验台在25.6 kHz 采样率下采集了正常、内圈、外圈及滚动体共 10 类故障状态的振动信号,并按 0.2/0.4/0.6 mm 三种损伤直径建立数据集。接着,提出“FFT+归一化+重塑”的数据预处理流程,将 1024 点一维时域信号转换为 32 × 32 的二维频域张量,适配轻量级卷积网络。最后,模型端采用融合深度可分离卷积与反向残差结构的轻量化主干网络,并引入**深度适配网络(DAN)与最大均值差异(MMD)**实现无监督跨工况领域自适应,完成跨工况迁移诊断。
2.Labview智能诊断系统界面介绍
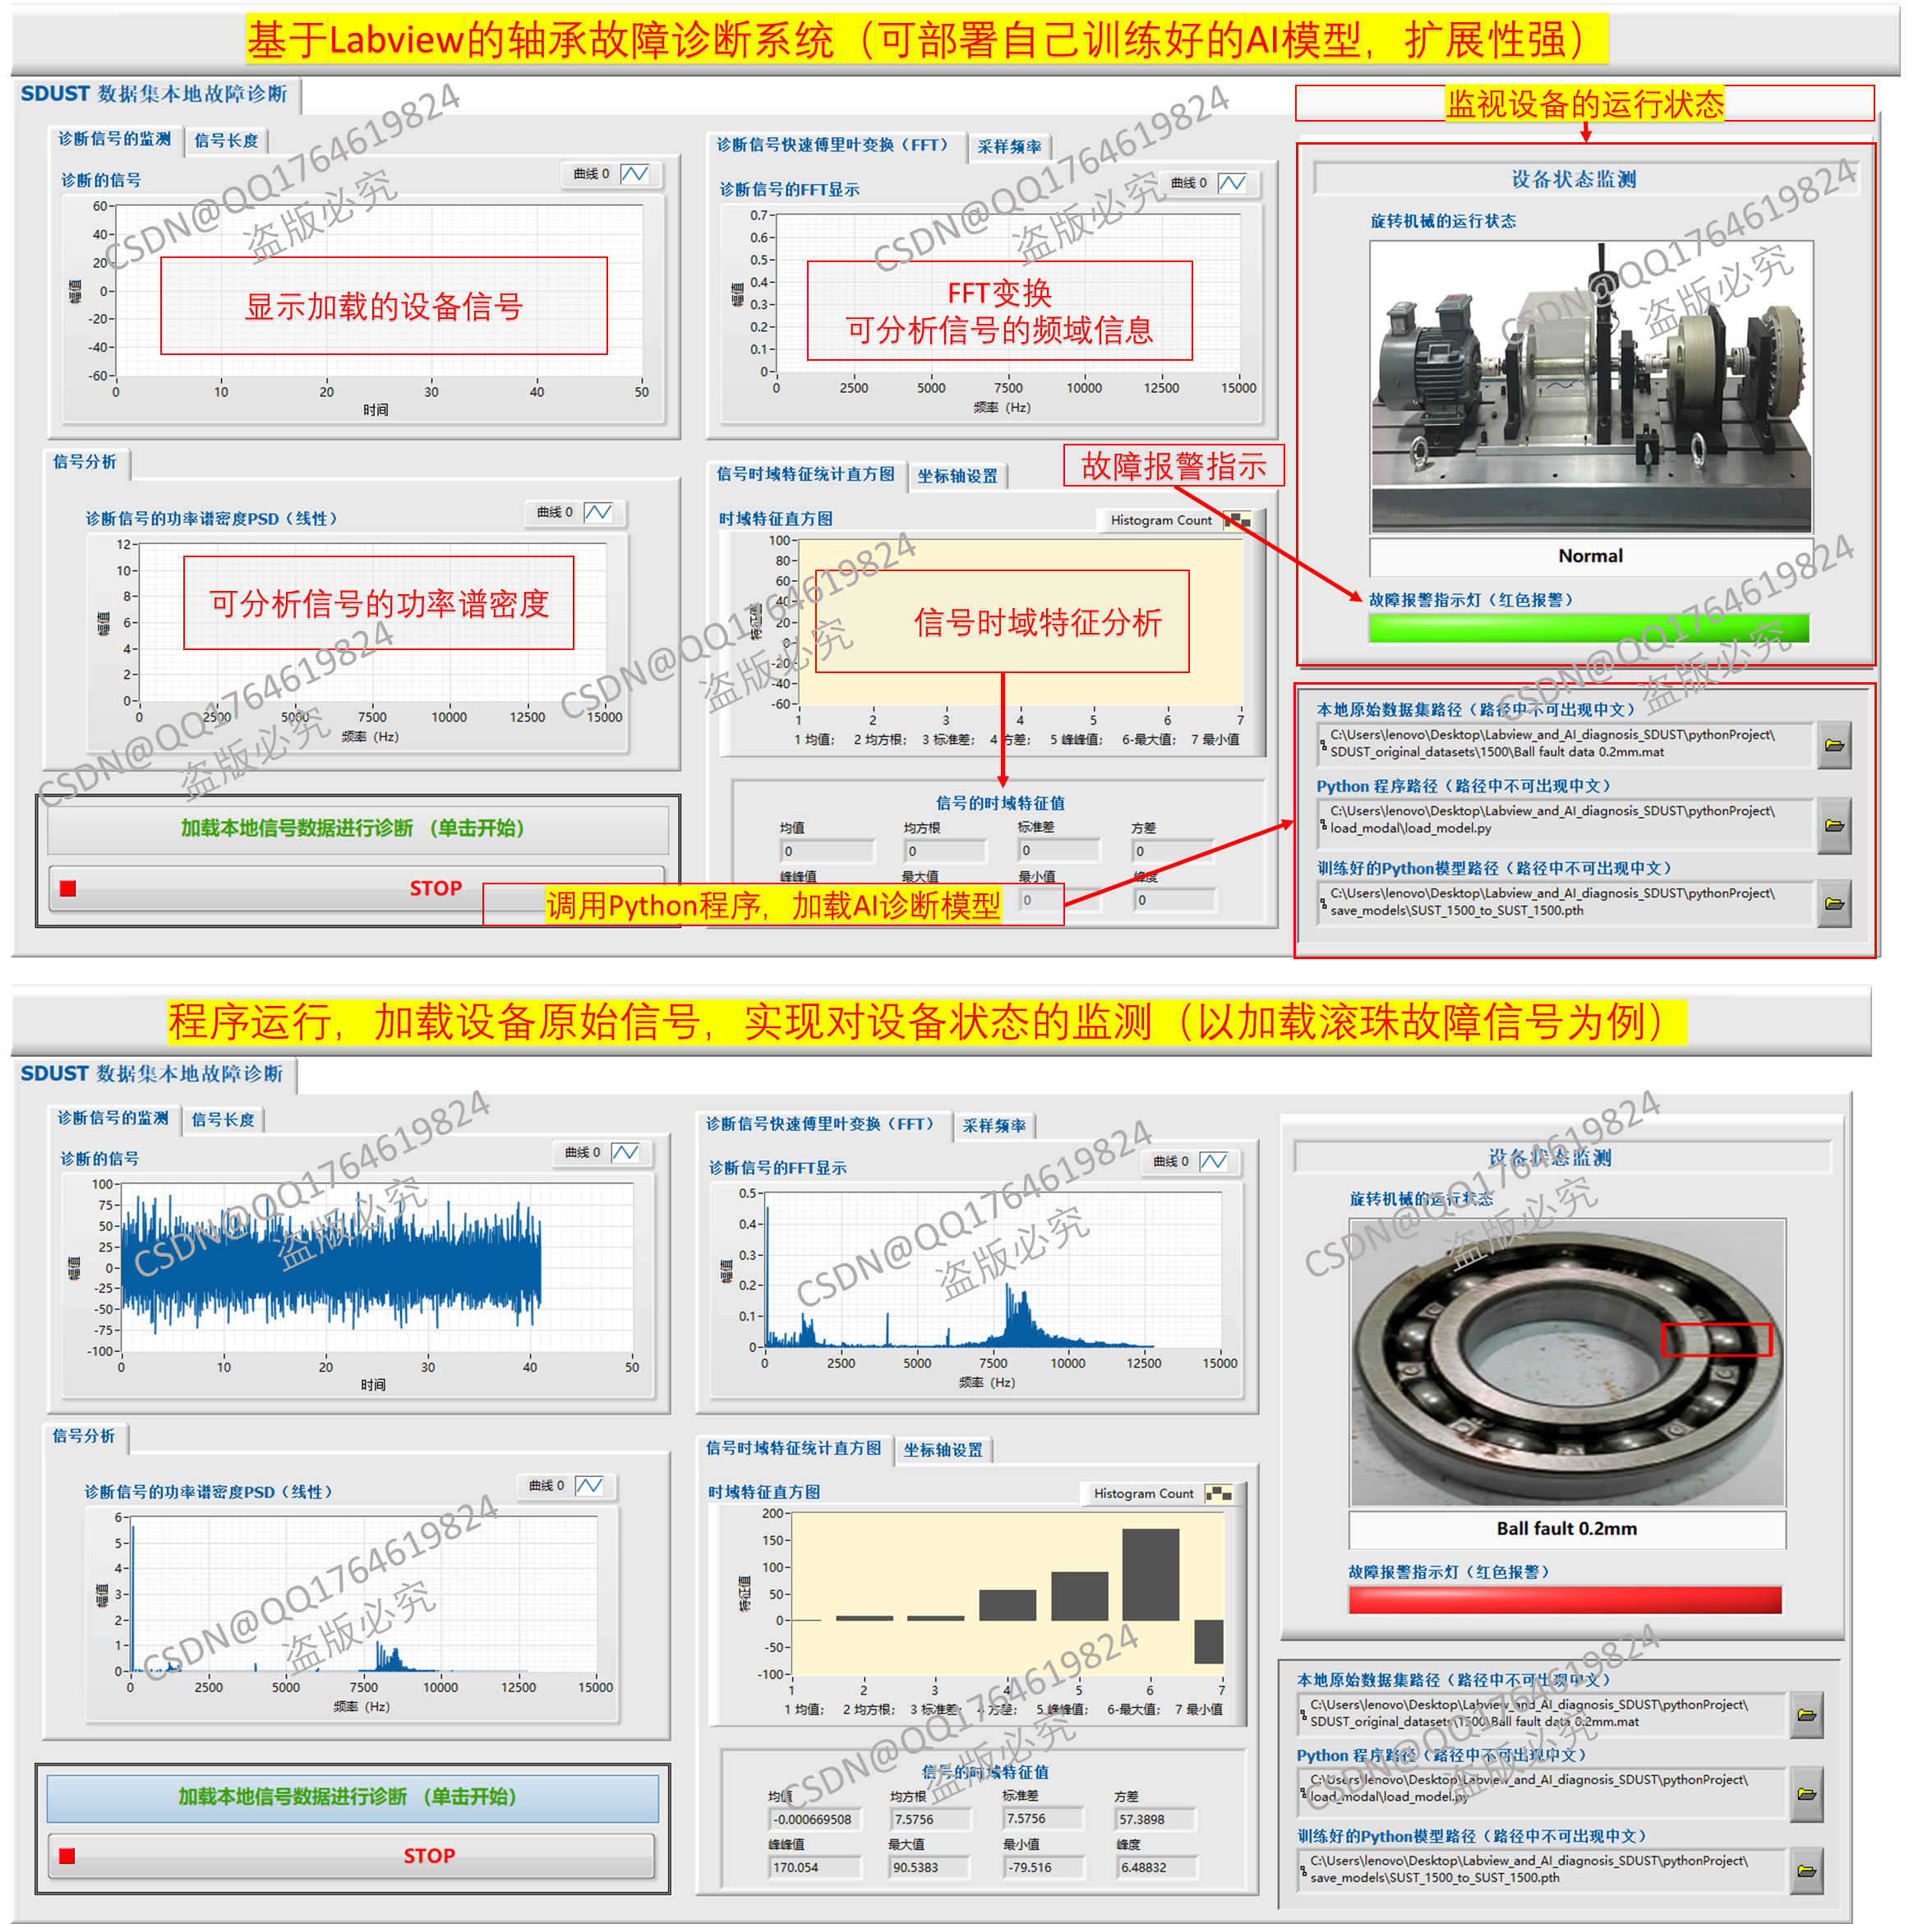
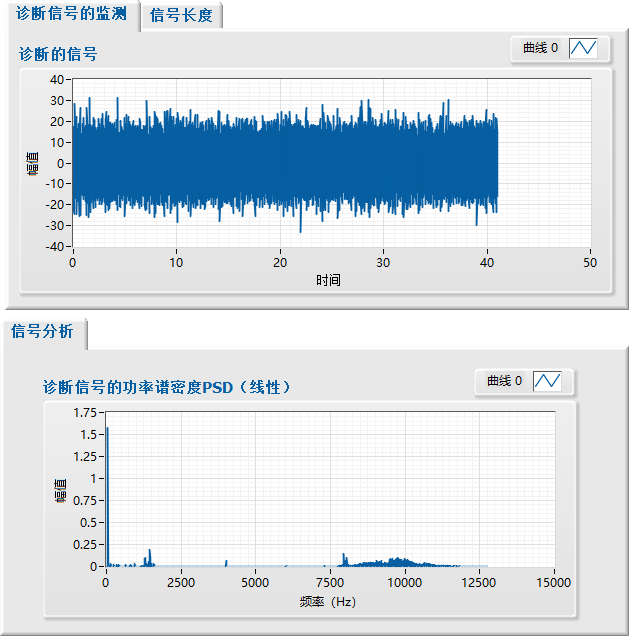
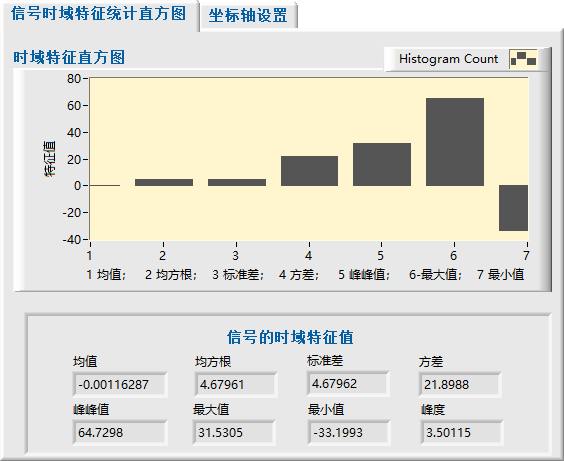
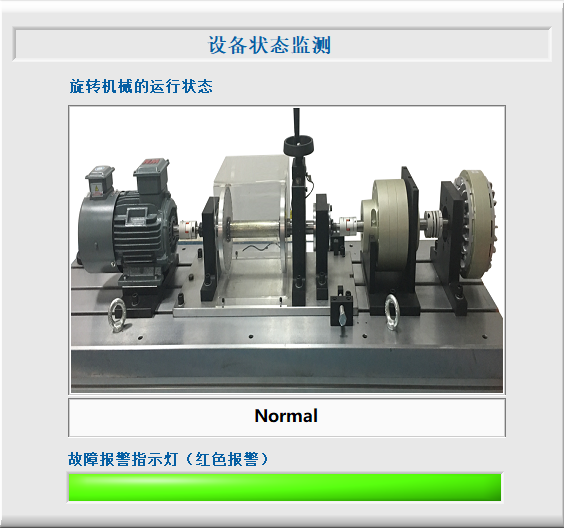
本系统是一个基于LabVIEW与AI模型融合的旋转机械信号分析与智能故障诊断平台,如下图所示。该系统主要面向旋转机械设备的状态监测与智能故障诊断,结合 LabVIEW的可视化界面 与 Python的深度学习模型,实现了从信号采集、分析到智能诊断的完整流程。以加载内圈0.2mm和外圈0.2mm轴承故障信号进行诊断为例,结果如下图所示。
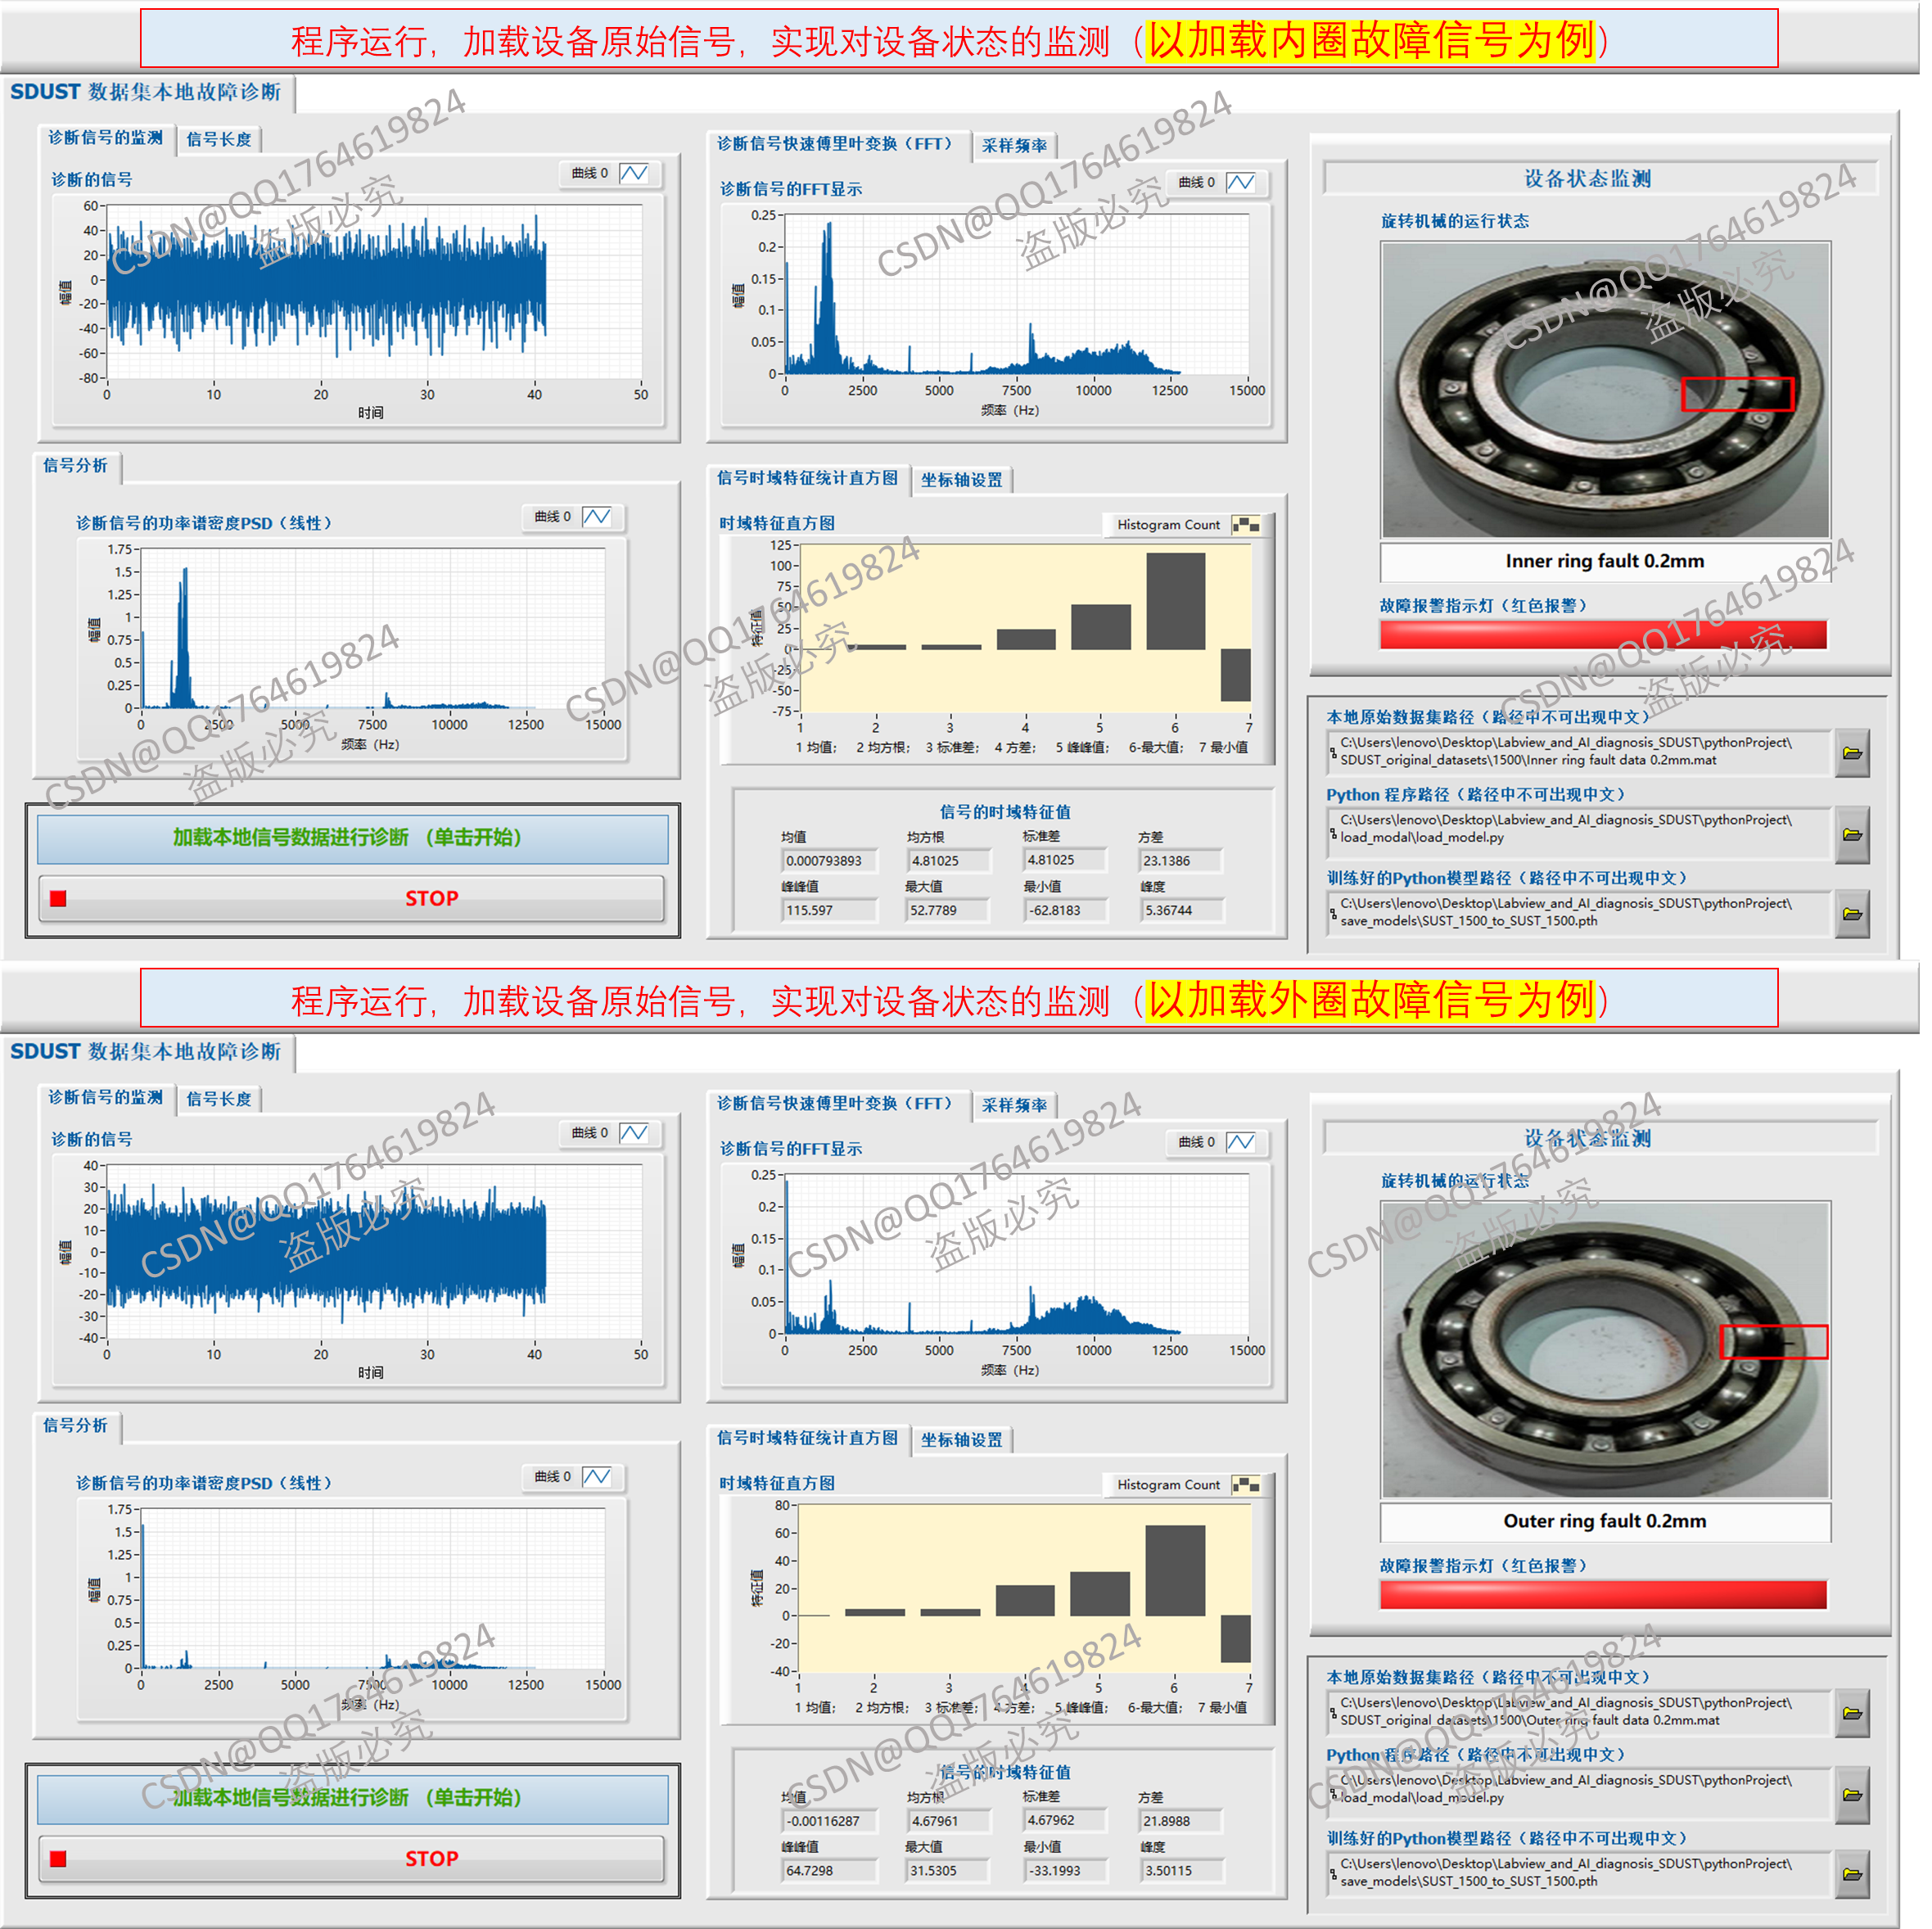
图1. 智能诊断系统运行界面
Labview智能诊断系统的具体功能如下:
2.1 数据加载与诊断
- 系统支持加载本地旋转机械信号数据(例如山科SDUST轴承数据集)。可以调用Python训练好的AI模型,实现对新输入信号的自动故障识别。

2.2 信号监测与显示
可加载并显示诊断信号的时域波形。进行快速傅里叶变换(FFT),显示信号的频域特征。提供功率谱密度(PSD)分析,辅助判别故障特征频率。
2.3 特征提取与分析
自动计算时域统计特征(均值、标准差、偏度、峭度等)。提供直方图展示时域特征分布情况。
2.4 设备状态监测
系统通过AI模型的诊断结果输出设备运行状态(如Normal、Fault)。配置报警指示灯,若发现异常则红灯报警。
2.5 Python****集成
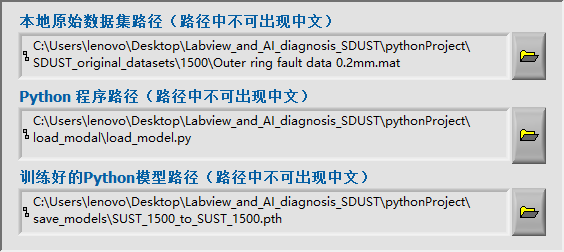
系统能调用Python脚本和已训练好的深度学习模型。支持模型加载与预测,结合LabVIEW界面实现人机交互。Labview调用的python脚本程序如下:
from models.Lightweight_model import Lightweight_model
import torch
import numpy as np
from scipy.fftpack import fft
from sklearn.preprocessing import normalize as norm

def process_data(data):
    # Ensure the input is a numpy array
    data = np.array(data)
    # Take the first 1024 points
    data = data[:1024]
    fft_norm = True
    if fft_norm:
        # FFT normalization
        data = abs(fft(data))
        data = norm(data.reshape(1, -1))
    else:
        pass
    # Reshape to (1, 1, 32, 32)
    data = data.reshape(1, 1, 32, 32)
    # Convert to a PyTorch tensor
    tensor = torch.from_numpy(data).float()
    return tensor

def predict(data, model_path):
    diagnostic_data = process_data(data)
    model = Lightweight_model(class_num=10)  # num_classes根据数据集类别数进行修改
    model.load_state_dict(torch.load(model_path, map_location='cpu'))  # 加载模型参数
    model.eval()
    with torch.no_grad():
        output, _, _, _, _ = model(diagnostic_data)
        _, predicted = torch.max(output.data, 1)
    return predicted
3. 深度自适应迁移学习网络介绍
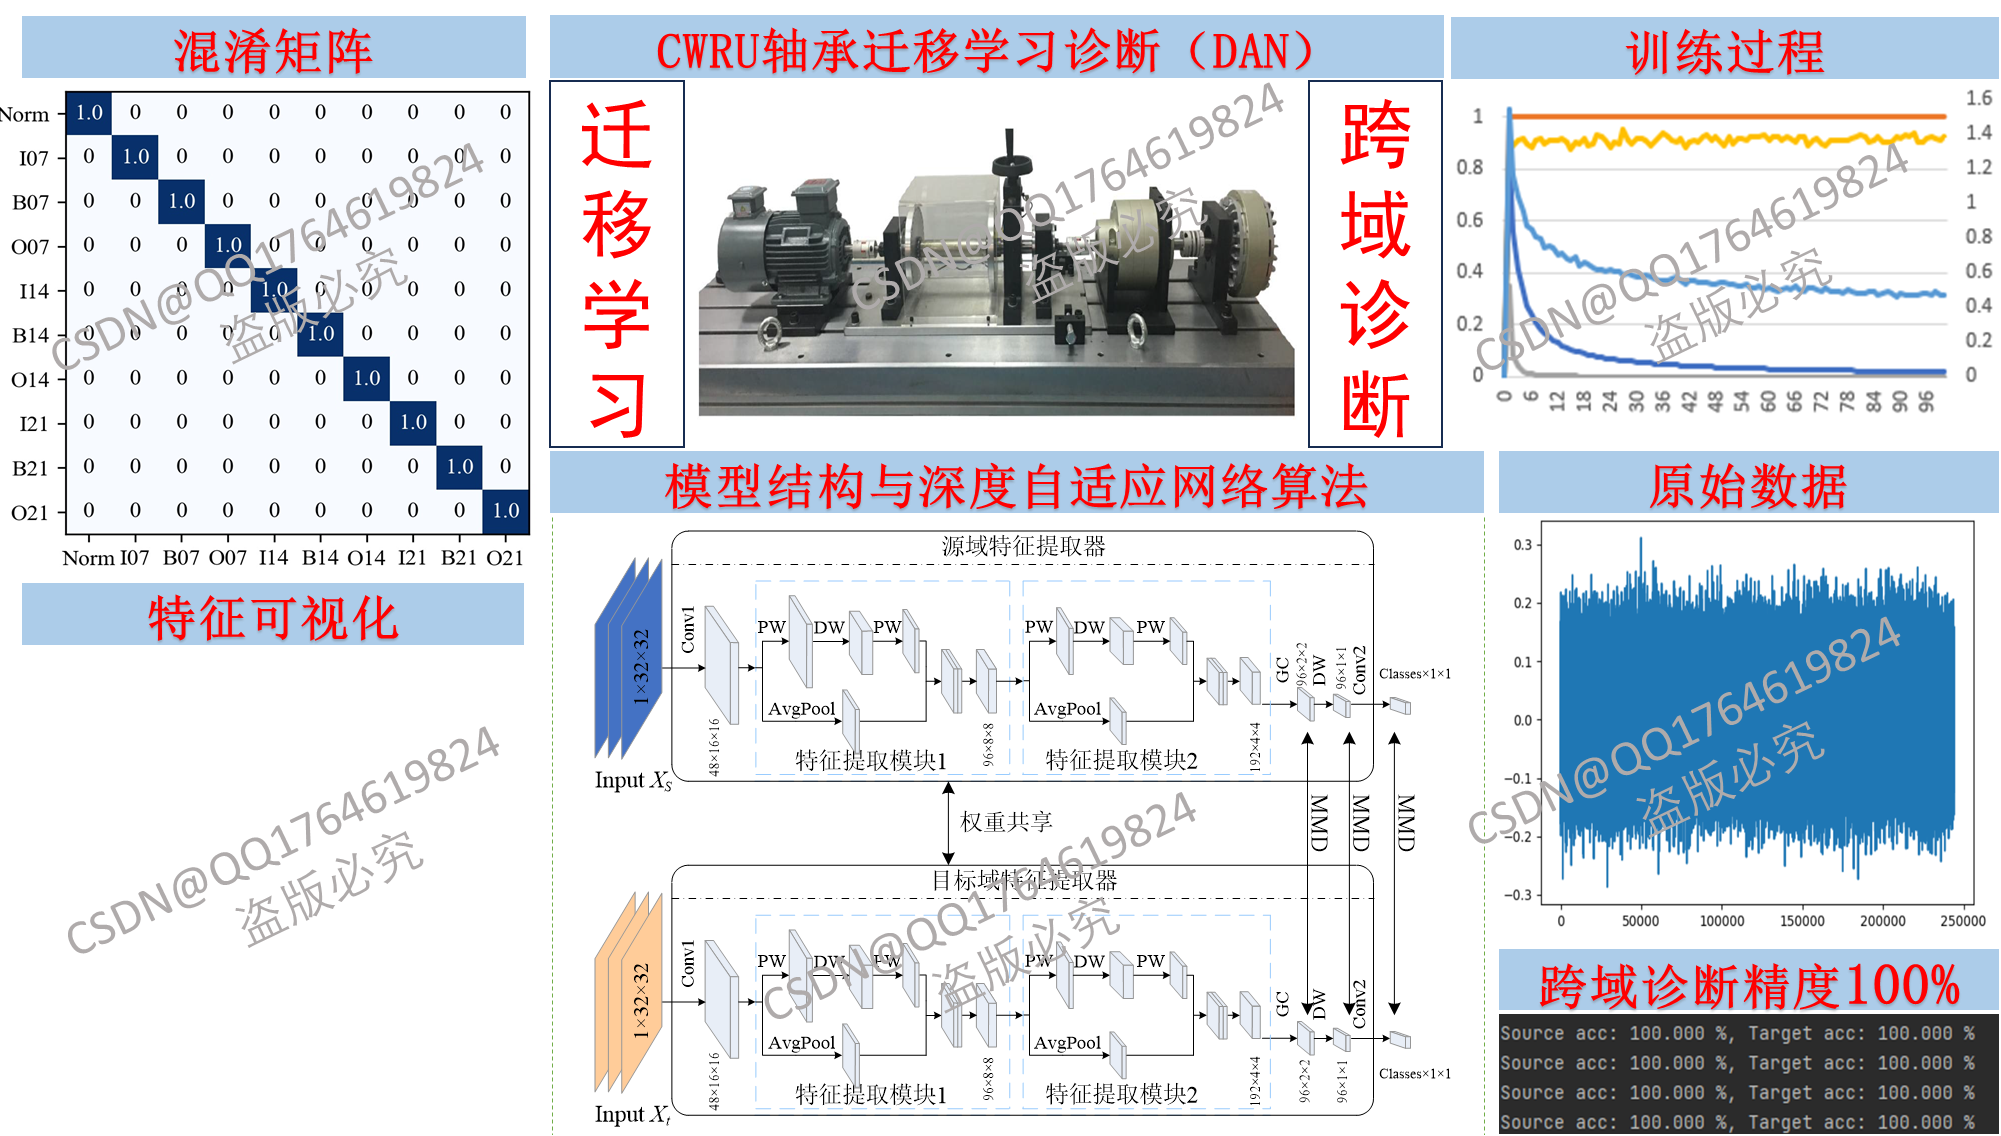
基于Labview的智能诊断系统将调用深度自适应网络(Deep Adaptation Network,DAN)模型来完旋转机械的智能诊断。接下来将讲解从零开始搭建深度自适应网络(Deep Adaptation Network,DAN)算法,如下图所示。项目包括加载SDUST轴承原始信号,信号处理、数据集制作,模型搭建,DAN深度领域自适应算法设计、特征可视化,混淆矩阵等流程来帮助读者学习基于迁移学习/变工况/域适应的故障诊断。学懂本项目即可了解基于迁移学习的故障诊断基本流程。本项目中[所有程序代码包含详细的注释],适合新生小白学习。本项目SDUST数据集变工况迁移诊断准确率可达99%以上。
3.1试验台介绍
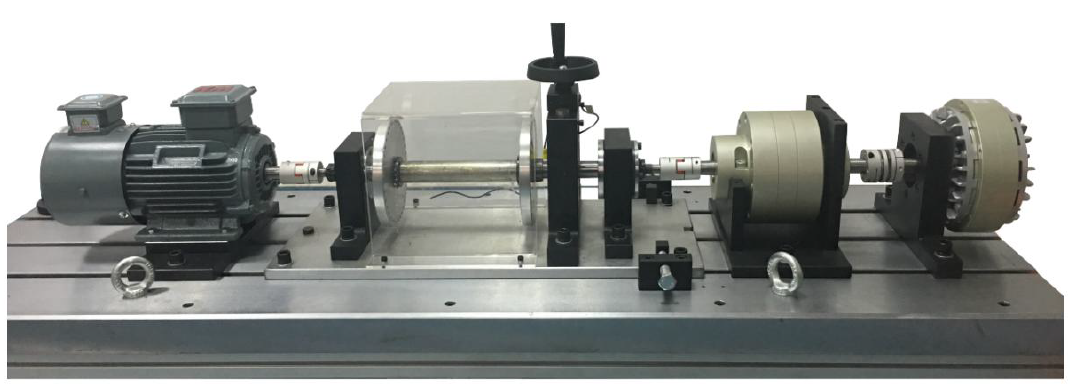
山东科技大学(Shandong University of Science and Technology, SDUST)旋转机械传动部件故障植入试验台如下图所示,是由镇江天语科技有限公司加工制造。该试验台由交流电动机、电动机转速控制器、测试轴承、齿轮箱,用于控制负载的手柄和磁粉制动器等组成,可以开展各类滚动轴承和齿轮在不同工况下的故障诊断试验,试验部件为为 6205 轴承与行星齿轮箱。
该数据集包括四种轴承不同轴承健康状态,即正常状态、内圈故障、外圈故障和滚动体故障。分别有0.2mm、0.4mm和0.6mm三种故障直径。该电动机在1000、1500、1800、2000、2500、3000r/min四种不同的转速和0、20、40和60N四种不同负载下收集振动信号,累计共16种工况。(本项目选用0N下的1500、2000、2500、3000r/min四种工况**)。**
3.2 数据预处理
数据预处理部分主要是将原始信号划分为训练集和测试集,以用于训练模型。该部分包括:
- 加载原始信号,从.mat原始数据中加载信号数据;
- 信号分割,即将原始信号分割为多个样本;
- 信号变换,将时域信号转换为频域信号;
- 信号归一化,将信号进行归一化处理;
- 信号重塑,将信号转换为[batch, channel, height, weight]的数据,以便于输入卷积模型;
- 数据集生成,将每个类别的样本和标签进行拼接,组成一个完成的训练集。

3.2.1加载原始信号
从mat文件中加载原始的信号,如下图所示。

3.2.2信号分割
从原始信号中随机采样n个样本长度为1024的样本,如下图所示。

3.2.3对原始信号进行FFT变换

3.2.4信号重塑
将长度为[1024]的一维频域信号重塑为[32, 32]的二维信号,如下图所示。

3.3.模型介绍
3.3.1模型结构介绍
本项目使用的 主要由标准卷积(Conv1和Conv2)、轻量化特征提取块(Block1和Block2)和分组卷积GC组成,如下图所示。

import torch
import torch.nn as nn
from models.Lightweight_model_block import InvertedResidual_Block

class Lightweight_model(nn.Module):
    def __init__(self, input_size=32, class_num=10):
        super(Lightweight_model, self).__init__()
        model_size = '0.5x'
        # print('model size is ', model_size)
        # self.stage_repeats = [4, 8, 4]  # 每个stage重复次数
        self.stage_repeats = [1, 1]  # 每个stage重复次数
        # self.stage_repeats = [1, 1, 1]  # 每个stage重复次数
        self.expand_ratio = 1
        self.model_size = model_size
        self.n_class = class_num

        self.avegpool2 = nn.AvgPool2d(kernel_size=3, stride=2, padding=1)

        if model_size == '0.5x':
            self.stage_out_channels = [-1, 48, 96, 192]
            # self.stage_out_channels = [-1, 24, 48, 96, 192]
            # self.stage_out_channels = [-1, 48, 96, 192, 384, 1024]

        elif model_size == '1.0x':
            self.stage_out_channels = [-1, 24, 116, 232, 464]
        elif model_size == '1.5x':
            self.stage_out_channels = [-1, 24, 176, 352, 704]
        elif model_size == '2.0x':
            self.stage_out_channels = [-1, 24, 244, 488, 976]
        else:
            raise NotImplementedError

        # building first layer
        input_channel = self.stage_out_channels[1]

        # 1. 先经过3x3标准卷积,原始shuffle net V2: stride=2
        self.first_conv = nn.Sequential(
            nn.Conv2d(1, input_channel, kernel_size=4, stride=2, padding=1, bias=False),
            nn.BatchNorm2d(input_channel),
            nn.ReLU(inplace=True)
        )

        # 2. 最大池化
        # self.maxpool = nn.Sequential(nn.MaxPool2d(kernel_size=3, stride=2, padding=1))

        # 3. 三个stage
        self.features = []
        for initial_indexstage in range(len(self.stage_repeats)):
            numrepeat = self.stage_repeats[initial_indexstage]
            output_channel = self.stage_out_channels[initial_indexstage + 2]

            # 每个stage重复调用block单元numrepeat次
            for i in range(numrepeat):
                # 每个stage首先进行stride=2的下采样
                if initial_indexstage == 0 and i == 0:
                    self.features.append(self.first_conv)
                    # self.features.append(self.maxpool)
                if i == 0:
                    self.features.append(InvertedResidual_Block(inp=input_channel, oup=input_channel, stride=2,
                                                                expand_ratio=1))
                # 之后为基本模块
                else:
                    self.features.append(InvertedResidual_Block(inp=input_channel, oup=input_channel, stride=1,
                                                                expand_ratio=1))

                input_channel = output_channel

        self.feature_extractor = nn.Sequential(*self.features)

        # 倒数第3层网络
        self.feature_extractor3 = nn.Sequential(
            # 分组卷积
            nn.Conv2d(in_channels=self.stage_out_channels[-1], out_channels=96,
                      kernel_size=3, stride=2, padding=1, groups=96),
            # nn.Dropout(0.2),
            nn.BatchNorm2d(num_features=96),
            nn.LeakyReLU(0.2),
        )
        # 倒数第2层网络
        self.feature_extractor2 = nn.Sequential(
            # dw 下采样
            nn.Conv2d(in_channels=96, out_channels=96,
                      kernel_size=3, stride=2, padding=1, groups=96),
            nn.BatchNorm2d(num_features=96),
            nn.LeakyReLU(0.2),
        )
        # 倒数第1层网络
        self.clf = nn.Sequential(
            nn.Conv2d(in_channels=96, out_channels=self.n_class, kernel_size=1, stride=1, padding=0, groups=1),
            # nn.Dropout(0.2),
        )

        self._initialize_weights()

    def dim_show(self, input):
        '''
        测试net函数内每一层的输出维度
        :return:
        '''
        X = input

        print('1.特征提取器:')
        for layer in self.feature_extractor:
            X = layer(X)
            print(layer.__class__.__name__, 'output shape: \t', X.shape)

        print('2.分类器:')
        for layer in self.feature_extractor3:
            X = layer(X)
            print(layer.__class__.__name__, 'output shape: \t', X.shape)
        for layer in self.feature_extractor2:
            X = layer(X)
            print(layer.__class__.__name__, 'output shape: \t', X.shape)
        for layer in self.clf:
            X = layer(X)
            print(layer.__class__.__name__, 'output shape: \t', X.shape)

        print('3.输出:')

    def forward(self, x):
        """
        前向传播,可以将cls后的倒数第一层的特征penultimate_layer1_feature输入判别器,也可以将feature_extractor2后的特征penultimate_layer2_feature输入判别器
        Args:
            x:故障数据
        Returns:分类预测,特征提取器提取的故障特征

        """
        penultimate_layer4_feature = self.feature_extractor(x)
        penultimate_layer3_feature = self.feature_extractor3(penultimate_layer4_feature)
        penultimate_layer2_feature = self.feature_extractor2(penultimate_layer3_feature)
        penultimate_layer1_feature = self.clf(penultimate_layer2_feature)
        x_pre = penultimate_layer1_feature.contiguous().view(-1, self.n_class)

        return x_pre, penultimate_layer1_feature, penultimate_layer2_feature, penultimate_layer3_feature, penultimate_layer4_feature

    def channel_shuffle(self, x):
        batchsize, num_channels, height, width = x.data.size()
        assert (num_channels % 4 == 0)
        x = x.reshape(batchsize * num_channels // 2, 2, height * width)
        x = x.permute(1, 0, 2)  # 矩阵转置
        x = x.reshape(2, -1, num_channels // 2, height, width)
        x = torch.cat((x[0], x[1]), 1)
        return x

    # 调整模型各层权重与偏置参数
    def _initialize_weights(self):
        for name, m in self.named_modules():
            if isinstance(m, nn.Conv2d):
                if 'first' in name:
                    nn.init.normal_(m.weight, 0, 0.01)
                else:
                    nn.init.normal_(m.weight, 0, 1.0 / m.weight.shape[1])
                if m.bias is not None:
                    nn.init.constant_(m.bias, 0)
            elif isinstance(m, nn.BatchNorm2d):
                nn.init.constant_(m.weight, 1)
                if m.bias is not None:
                    nn.init.constant_(m.bias, 0.0001)
                nn.init.constant_(m.running_mean, 0)
            elif isinstance(m, nn.BatchNorm1d):
                nn.init.constant_(m.weight, 1)
                if m.bias is not None:
                    nn.init.constant_(m.bias, 0.0001)
                nn.init.constant_(m.running_mean, 0)
            elif isinstance(m, nn.Linear):
                nn.init.normal_(m.weight, 0, 0.01)
                if m.bias is not None:
                    nn.init.constant_(m.bias, 0)
# 模型测试
if __name__ == "__main__":
    model = Lightweight_model(class_num=4)
    test_data = torch.rand(64, 1, 32, 32)
    model.dim_show(test_data)
    model_outputs = model(test_data)
    cls_pre, cls_pre_feature, feature3, feature2, feature1 = model_outputs
    print('Classifier output:{}'.format(cls_pre.size()))
    print('Classifier output:{},x4:{}, x3:{}, x2:{}, x1:{}'.format(cls_pre.size(), cls_pre_feature.size(), feature3.size(), feature2.size(), feature1.size()))
3.3.2模型结构参数介绍
具体的模型结构如下表所示。
| 结构 | 卷积核尺寸 | 步幅 | Padding | 输出通道 | 输出尺寸 |
| 信号 | -/- | -/- | -/- | 1 | 32×32 |
| Conv1 | 3×3 | 2 | 1 | 48 | 16×16 |
| PW | 1×1 | 1 | 0 | 48 | 16×16 |
| DW | 3×3 | 2 | 1 | 48 | 8×8 |
| PW | 1×1 | 1 | 0 | 48 | 8×8 |
| Avgpool | 3×3 | 2 | 1 | 48 | 8×8 |
| 特征提取模块1通道拼接 | 96 | 8×8 | |||
| PW | 1×1 | 1 | 0 | 96 | 8×8 |
| DW | 3×3 | 2 | 1 | 96 | 4×4 |
| PW | 1×1 | 1 | 0 | 96 | 4×4 |
| Avgpool | 3×3 | 2 | 1 | 96 | 4×4 |
| 特征提取模块2通道拼接 | 192 | 4×4 | |||
| GC | 3×3 | 1 | 1 | 96 | 2×2 |
| DW | 3×3 | 2 | 1 | 96 | 1×1 |
| PW | 1 | 2 | 0 | 10 | 1×1 |
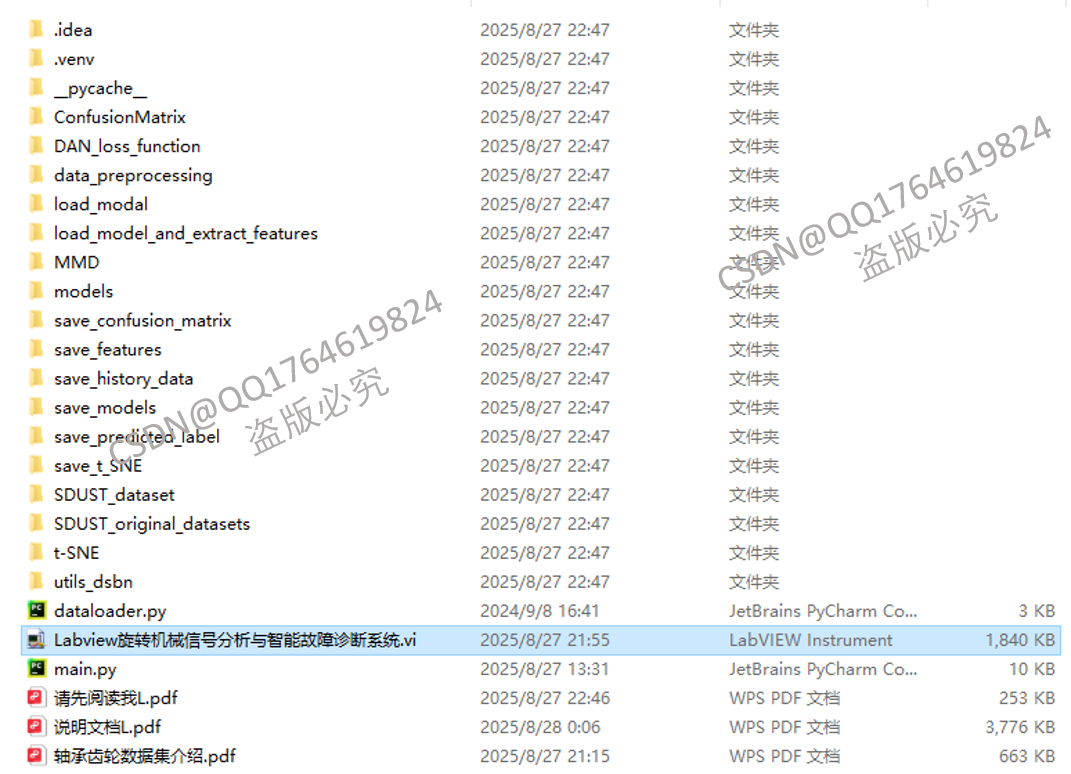
4.项目程序文件
5.说明文档
详细的说明文档如下,详细讲解了基于Labview的旋转机械故障诊断系统项目。
